

The death of Google Optimize is upon us. And wowee, aren’t you a little bit heartbroken. Gone are the days where you’ll be able to switch a button on your website from red to green and run a mindless A/B test. Now you have to pay $60,000 annually for that. But wait! What if I told you that you can continue to run A/B testing FOR FREE, leveraging tools that are probably already on your website. Would you pay me $60,000? How about $2? I’ll take it…
Now don’t get me wrong, you should absolutely invest in an A/B testing platform. They have a butt-ton—(can I say butt-ton?…no? Ok how about boatload)—a boatload of features that go beyond what I am about to show you. Also, A/B testing in general should have a dedicated process, with a well-thought-out testing matrix, strategists, developers, designers and analysts. If you’re going to have all of that, you should probably have a dedicated tool,right? If you just want to be a little whimsical about it though, I will show you how to do testing without anything fancy. Just a little grease on your Google Tag Manager wheels and any analytics platform.
Basic Steps Below:
How to A/B Test for Free with Google Tag Manager, and any marketing analytics tool.
- Create a New Cookie in GTM
- Create a GTM Experiment Tag
- Build a Variable to Capture the 1st Party Cookie
- Build a Variable to Generate a Random Number Between 0-99
- Create a RegEx table Variable for the Cookie
- Update Cookie Tag with RegEx Table Variable
- Create a Custom HTML Tag with Your Changes
- Trigger Your Test on the Variation Trigger.
- Build Out the Analytics Portion
- Build Your Conversions
- Set Up the Conversion in Your Marketing Analytics Tool
- Set Up Your Custom Dimension in your Marketing Analytics Tool
- Finally, Let’s Build our Audiences!
- Integrate with Heatmap Let’s get started. First, this post assumes that you have a basic understanding of Google Tag Manager, triggers, variables, & tags. If you don’t, then please leave and go to MeasureSchool’s YouTube to learn all about the tool. If you are still reading then I’ll assume we’re good to go.
Create a New Cookie in GTM
First lets build a Cookie in GTM by importing the template “Cookie Creator” from the Community Gallery. Review the permissions (which allow cookies to be written if you specify them in the template) of this Tag Template and select “Add to Workspace.”

You can also just build a cookie using custom HTML, but why work harder than you have to? Once you have imported it into your templates and accepted permissions, you can start building multiple cookies with ease.
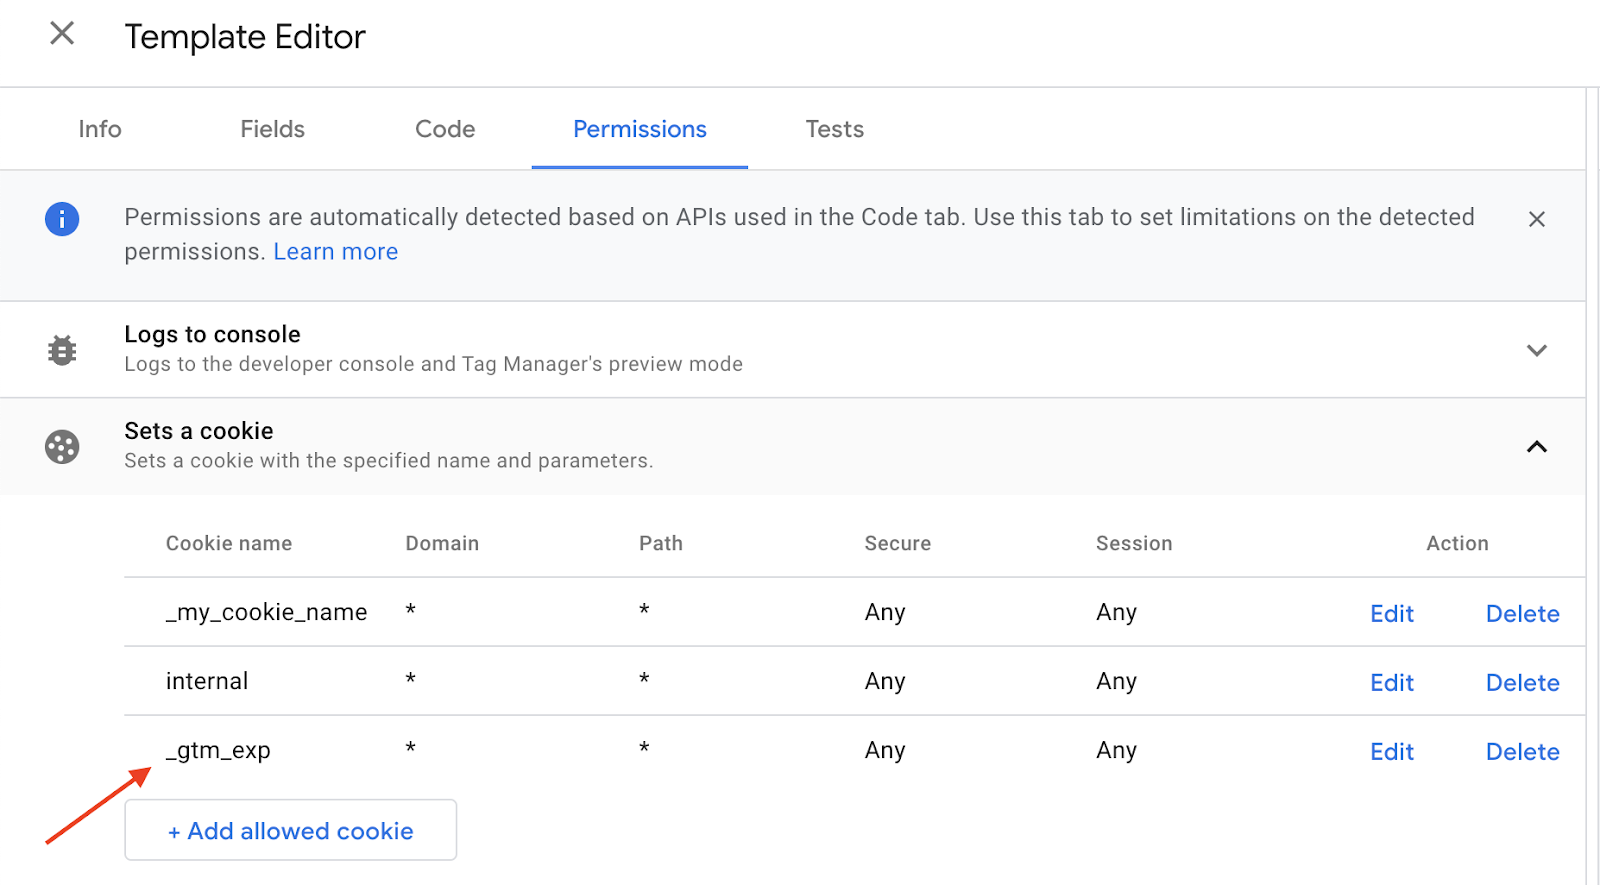
Before we start building our experiment, we need to allow this cookie creator to build the cookie we tell it to. To do this, open the Cookie Creator template and navigate to “Permissions”.

Next add an allowed cookie for _gtm_exp or whatever identifier you’d like to build for your GTM experimentation.
Create a GTM Experiment Tag
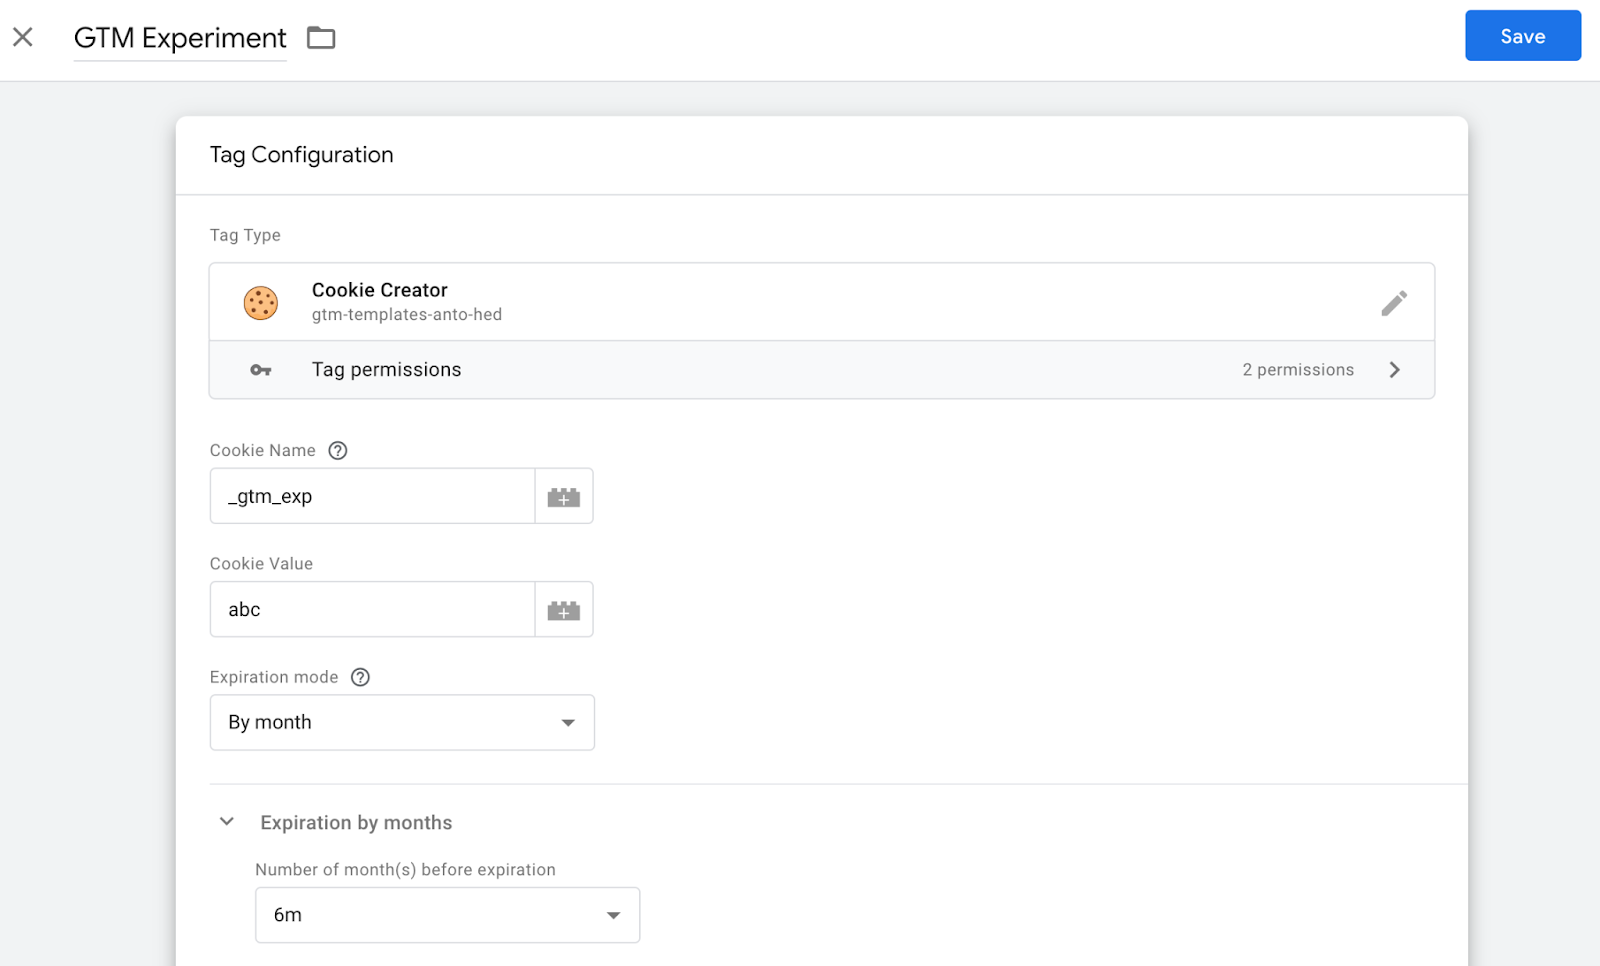
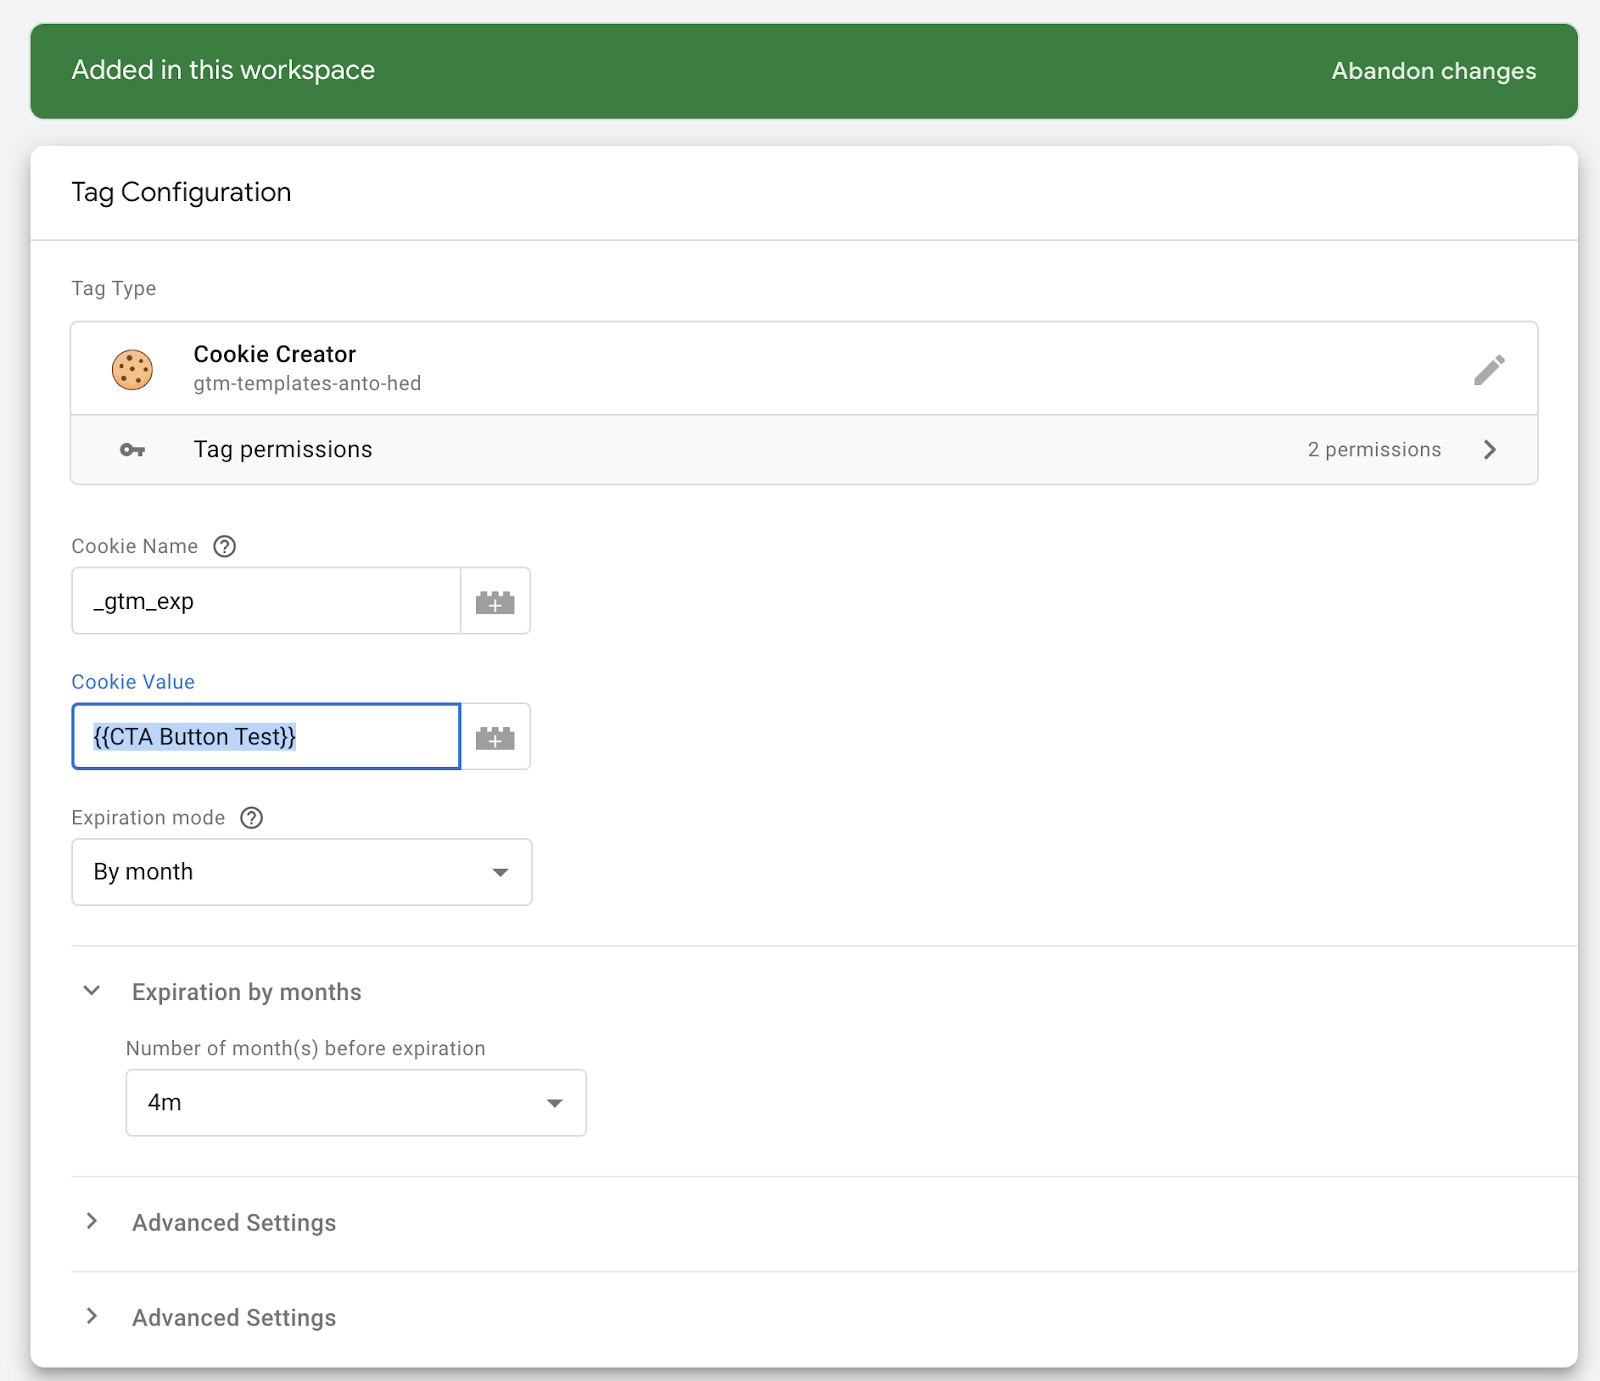
In the Tags tab, create a new tag using the Cookie Creator tag template you’ve just saved.
- Set Cookie Name to “_gtm_exp”
- Set Cookie Value to “abc”
- We’ll be updating this value later to dynamically populate based on random allocation. Since we can’t save the tag with a blank value, let’s add “abc” to the cookie value for now.
- Set Expiration Mode to “By month”
- Set Expiration by Months to “6m”
- “Even if your experiment duration is shorter than 6 months, having a longer expiration date ensures that users will continue to see the same experiment on return visits until this cookie is removed”
You may want to set additional cookie options- like SameSite if you have subdomains, etc. -but we’re going to leave it blank for now. Feel free to use this FireFox pageas a resource for all the different configurations you can do with cookies.
You can save the tag without a trigger for now. We’ll come back to it!
Build a Variable to Capture the 1st Party Cookie
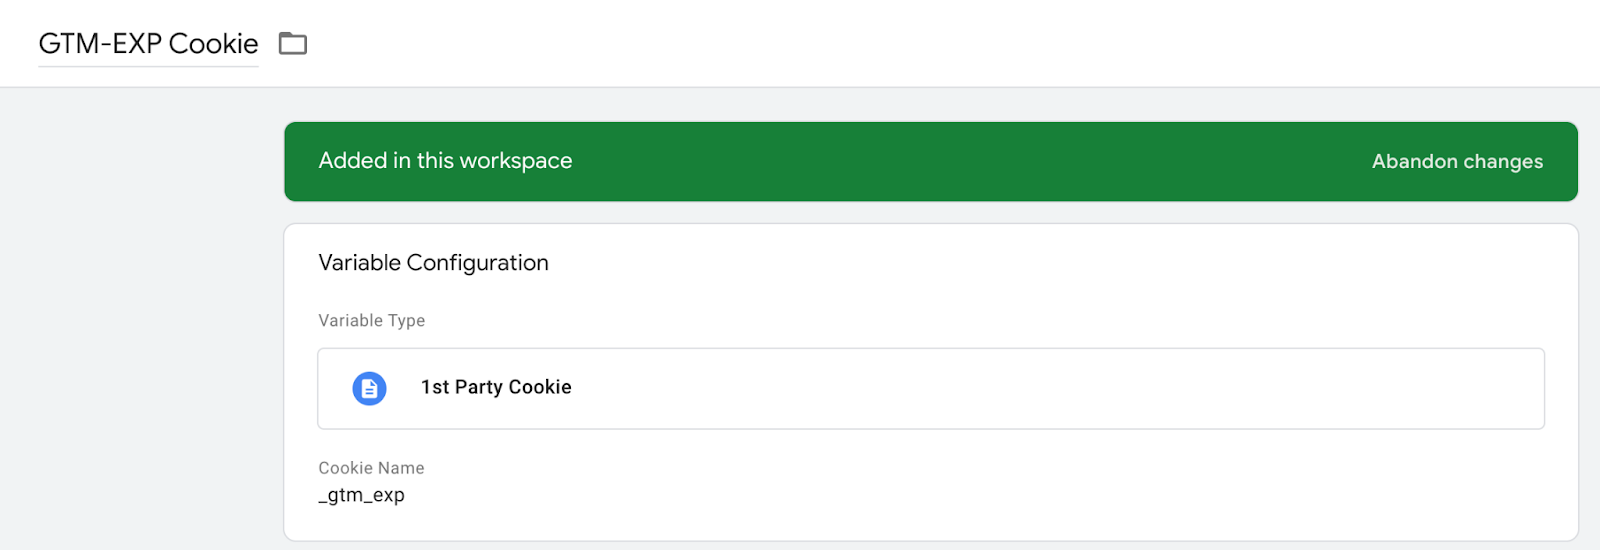
Let’s now go into our variables section and build a 1st Party Cookie to capture the new cookie value that we created:
- Navigate to the Variables tab
- Click to create a new User-Defined Variable
- Select “1st Party Cookie” as the Variable Type
- Update the Cookie Name to “_gtm_exp”
- Give your variable a name and save
Awesome. That was easy. We’ll come back to using this later.
Build a Variable to Generate a Random Number Between 0-99
Now, we want to create the functionality to generate a number from 0-99. This will become the basis of our test functionality.
- Click to create another User-Defined Variable
- Select “Custom JavaScript” as the Variable Type
- Add a function to generate a random number. Here is some code so you don’t have to look around on the web for it. You are welcome.
function() {
var math = Math.floor(Math.random() * 100);
return math
}
- Marvel in wonder at the highly advanced, complex bit of JavaScript you’ve just written
- Name your variable “Random Number (0-99)”
Create a RegEx table Variable for the Cookie
We now want to use our random number to set a cookie value based on whether a user is assigned to the control group or the test group. You could also create multiple variations by adjusting this logic with the amount of numbers that represent a version. In this version we are looking for 0-49 & 50-99 to set different variations, but you could easily adjust to 0-33, 34-66, 67-99 for an A/B/C test (etc.)
- Create a new RegEx Table variable
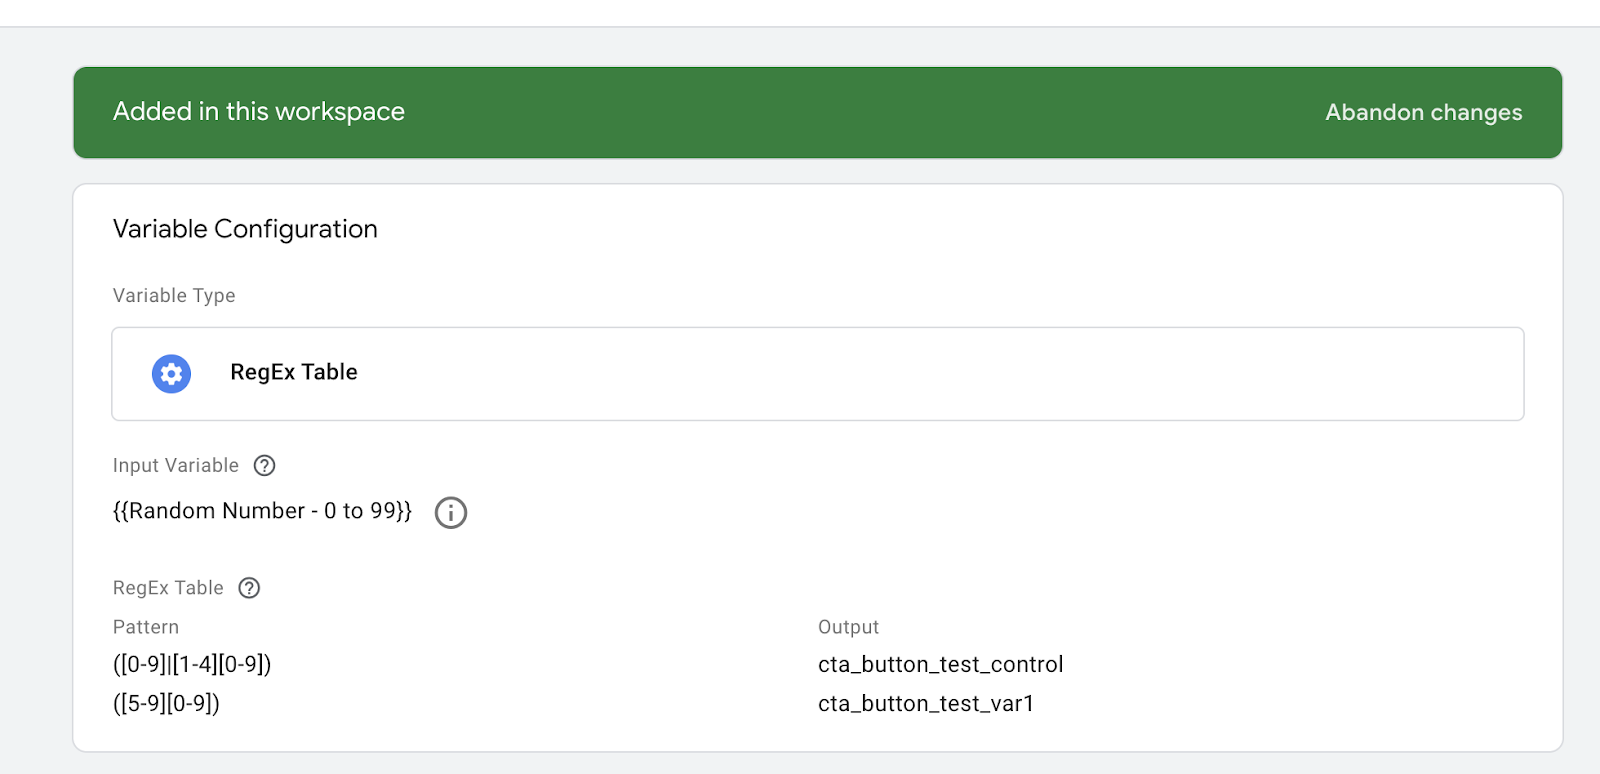
- Set the Input Variable to the random number variable you’ve just created
- Use this RegEx to target the split-test numbers:
- Control Group: 0 – 49
- RegEx Pattern: ([0-9]|[1-4][0-9])
- Test Group: 50-99
- RegEx Pattern: ([5-9][0-9])
- The Output values will be based on the type of test you are running. For this example, we’ll be doing a simple CTA button text change.
Update Cookie Tag with RegEx Table Variable
Now that we have our RegEx table, we can use it to build the functionality of our split test. We’ll be using the 0-49 randomized number to set the control & 50-99 to set the variant.
To do this we want to go back into our cookie creator tag and set the Cookie Value to our RegEx table.
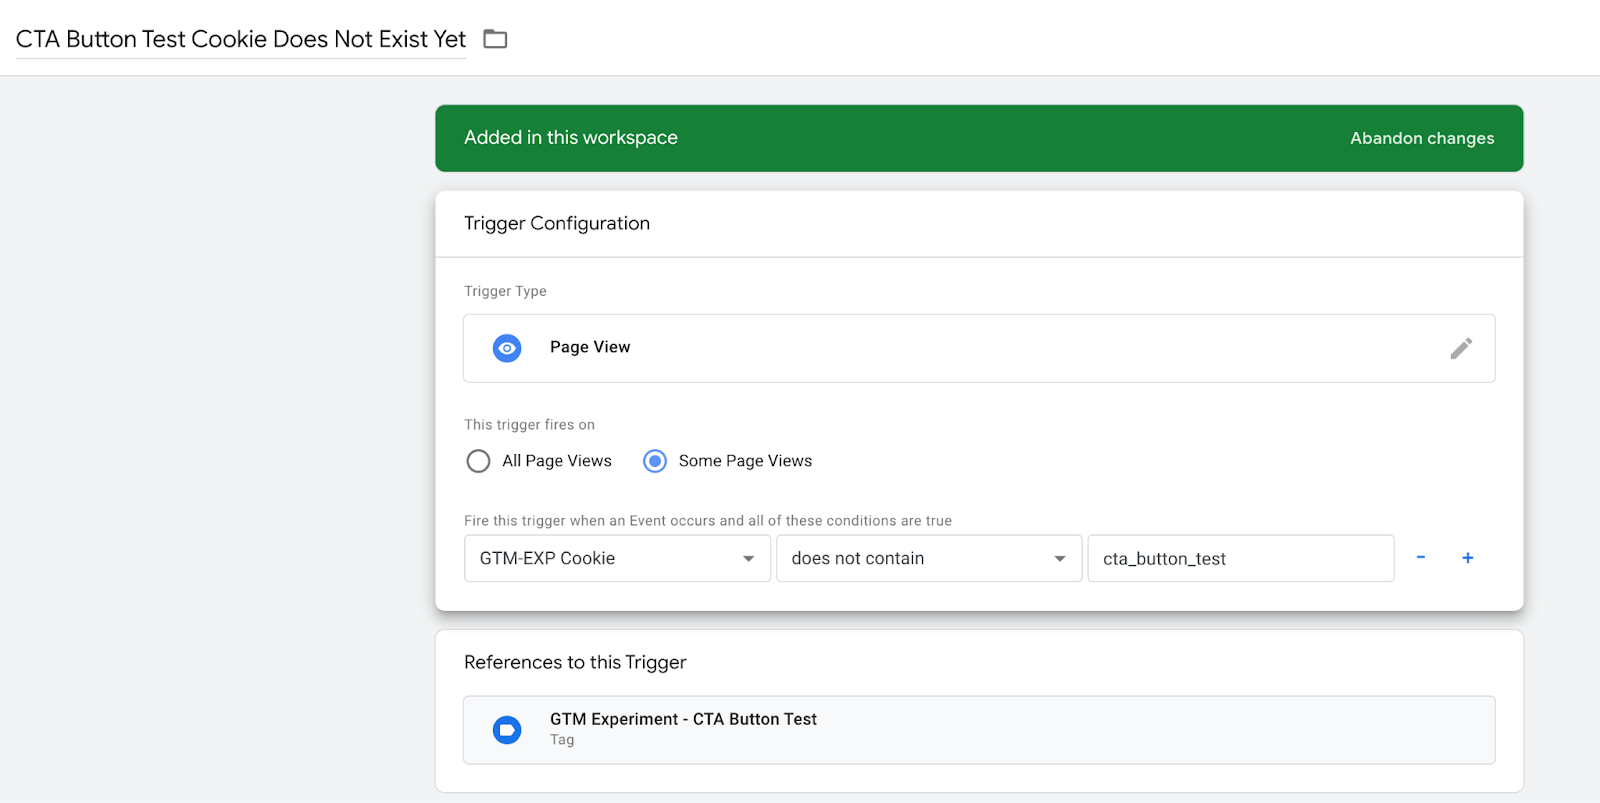
For the trigger we want it to fire on all pageview events where the cookie does not yet have a value that includes our test.
Now that we have the cookie in place, we can build our actual test.
Create a Custom HTML Tag with Your Changes
Now is probably the most challenging part. You are going to need to know a bit of JavaScript but if you don’t, ChatGPT is a great resource. Just ask it to help you target and change the element you want to change. Unfortunately, GTM is not equipped with a visual editor like Google Optimize to help you change. If you wish you can use a chrome extension such as “visual css editor” which has a lot of the same functionality as a CRO visual editor and even helps you export code. Overall, you will probably hit a snag at some point and need some help from either AI or a JavaScript developer. Regardless, I used ChatGPT for this change and if it’s good enough for me, it’s good enough for you!
For this example, we’ll be updating the text of the hero tagline by using a Custom HTML tag.
Step 1: Create a new Custom HTML tag. This will contain any necessary scripts to modify website content for your Test Group.
Step 2: In the HTML section, add your script. This example will be using the script below to update the text of the hero tagline:
<script>
var tagline = document.querySelector('.hero-tagline');
if (tagline) {
tagline.innerHTML = 'Build Sustainable Growth <i class="far fa-arrow-right" aria-hidden="true"></i>';
}
</script>
- Give your new tag a name. In this case, we’ll name it “Update Hero CTA for Test Group”
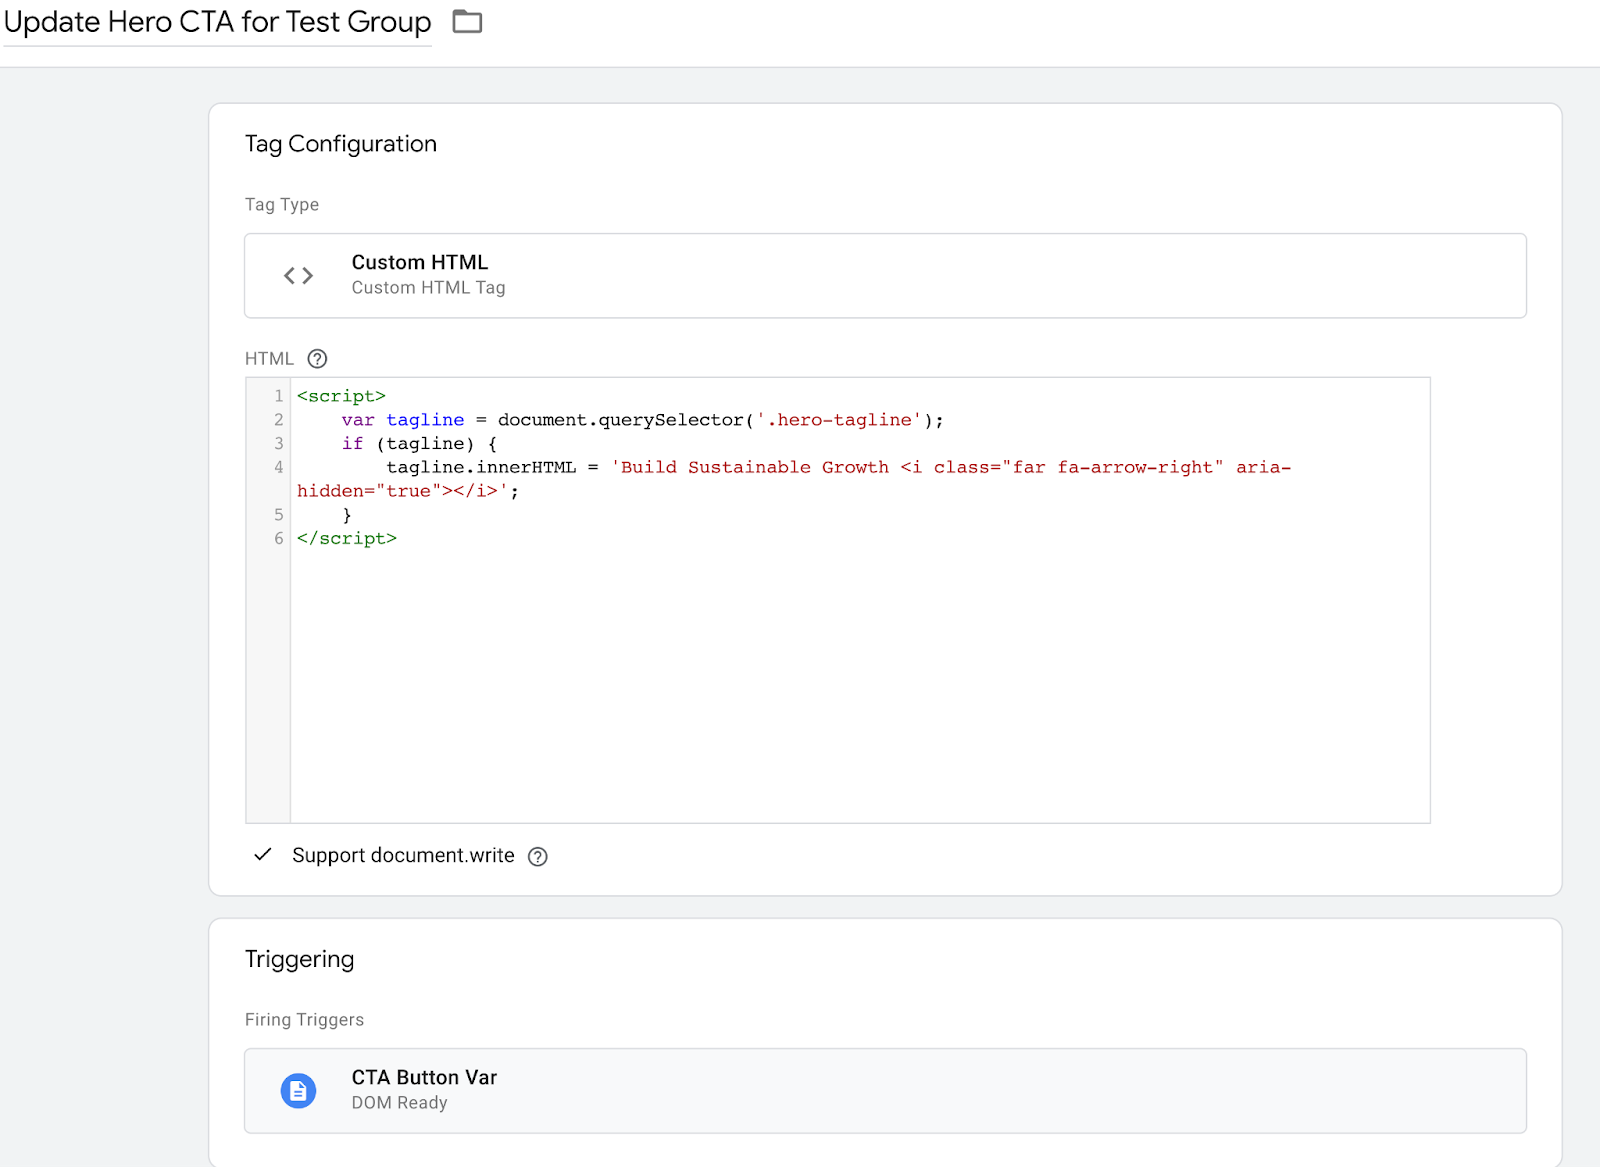
Now that we have our code, let’s trigger it on 50% of the traffic.
Trigger Your Test on the Variation Trigger.
Now that the cookie is placed, we just need to look for the value we want the test to trigger on and add our trigger condition to our Custom HTML tag.
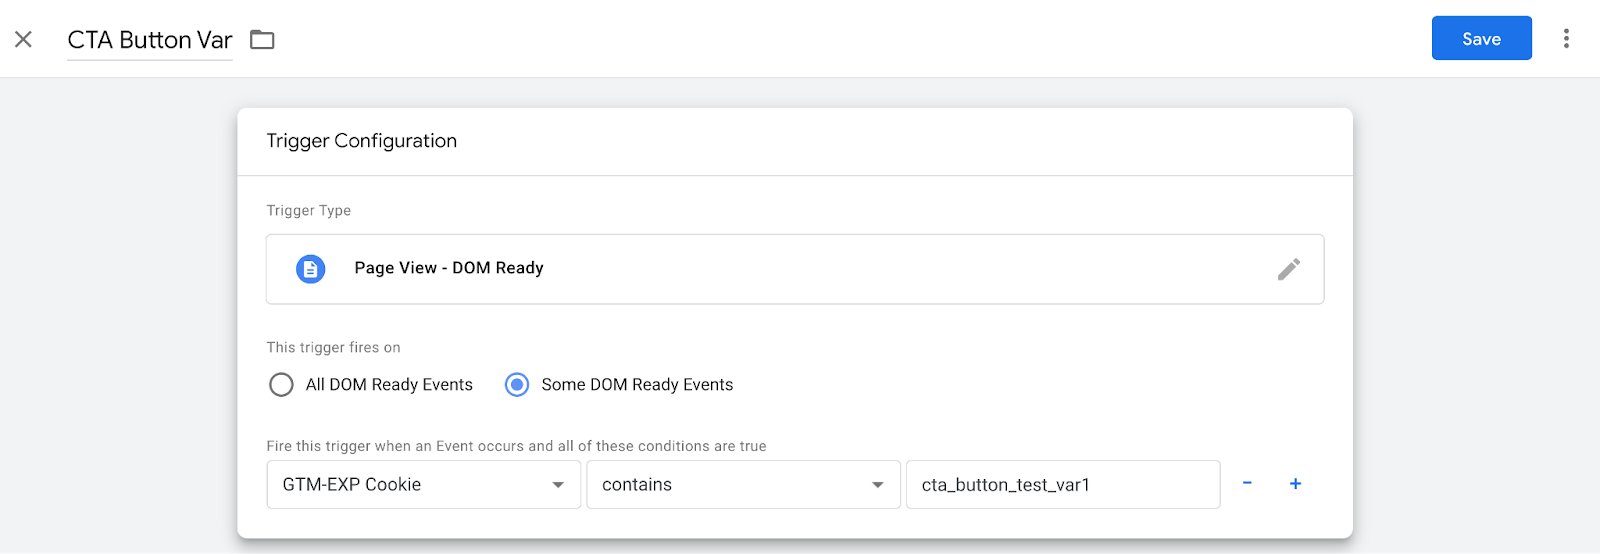
You will likely want to test at this point. Testing is pretty simple. Just go to your preview mode, and open the page you want to test on. You’ll get your randomly generated value and it will set a cookie since it’s your first time there. You can then navigate to the Chrome debugger and edit the cookie value between your control and variant by finding the cookie value in Applications and looking for our _gtm_exp cookie.
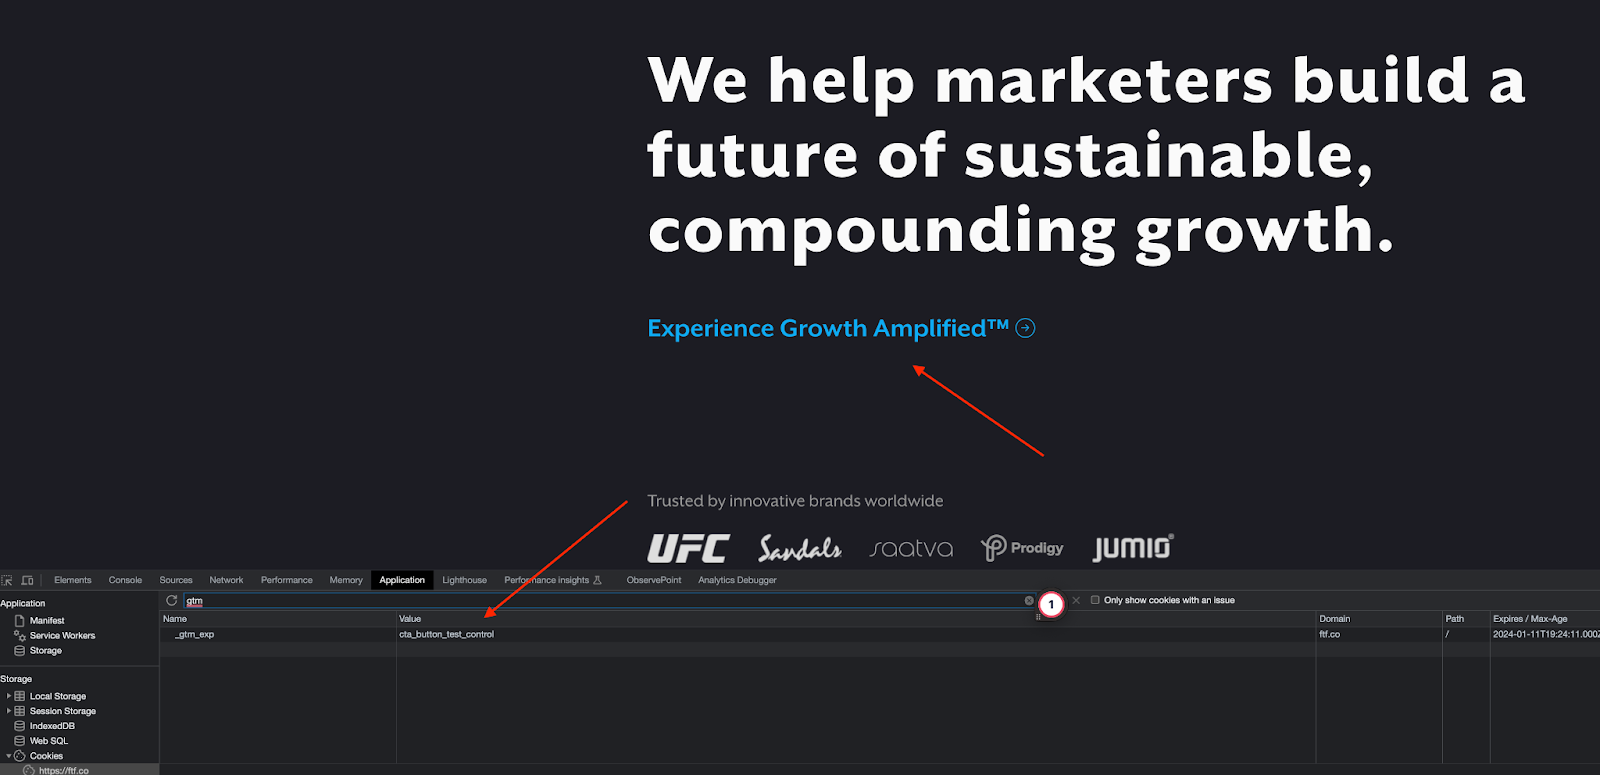
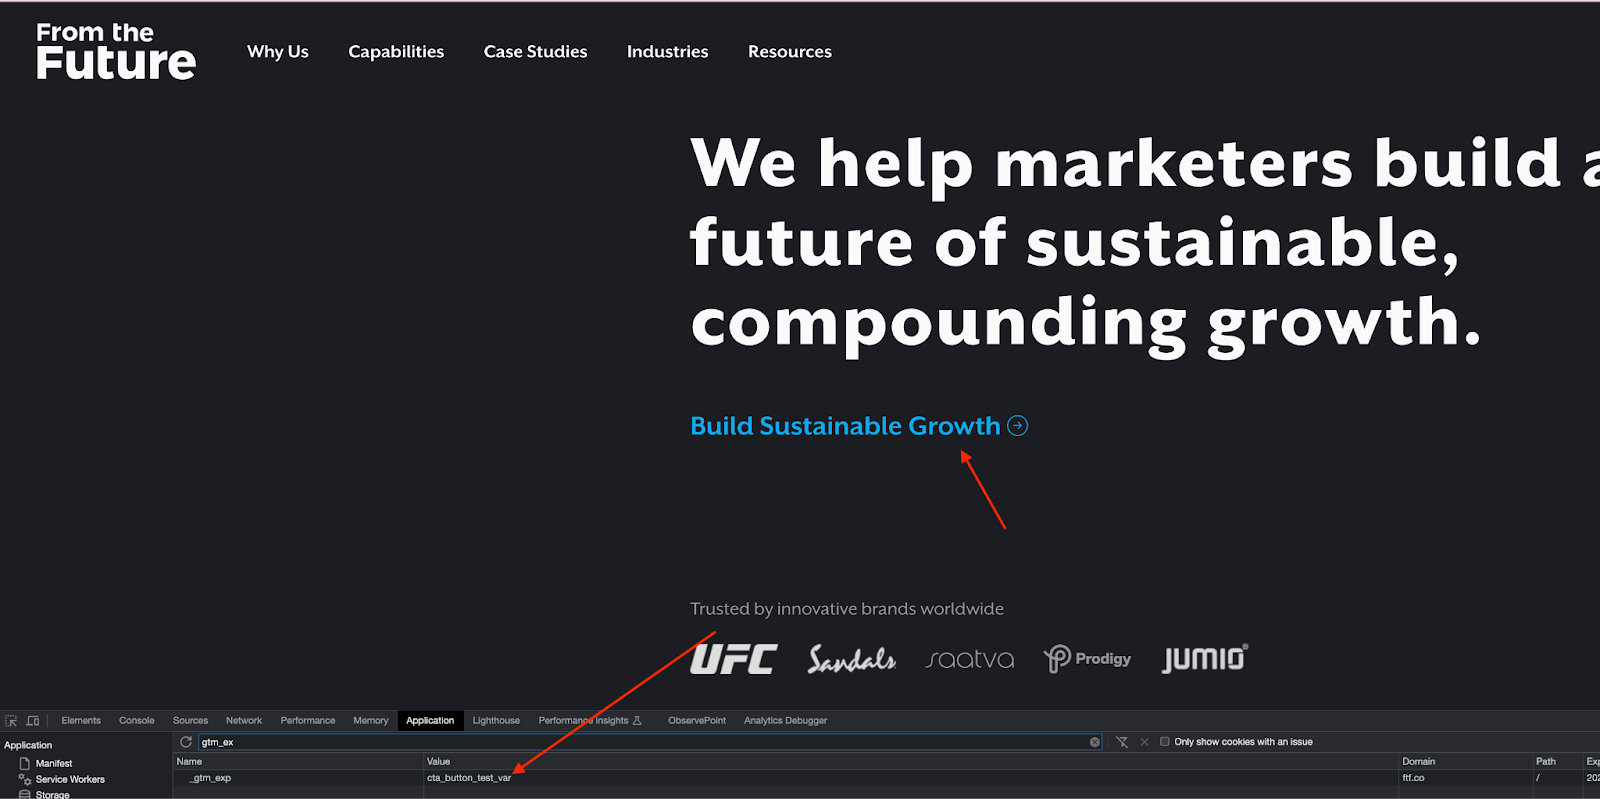
Great, now that we have the test setup portion done, let’s get that baby into our analytics system.
Build Out the Analytics Portion
This next part can be applied to ANY analytics tool. I will be focusing this blog on GA4 and Microsoft Clarity but the same process can be applied to Piwik Pro & HotJar, Matomo & ContentSquare. Whatever you want. We’re going to apply it to both a marketing analytics tool and a heatmap software just for fun but it can be used with just one tool if that’s your preference.
Add to your Analytics Tag
First, just like with CRO tools, we need to make sure our cookies load before information gets sent to our analytics tools. So if you are firing your marketing analytics tool on Pageview as well, we’re going to need to add an analytics event that fires when the cookie is set.
Let’s create the event. This event fires the actual event but also sets the cta_button_audience to the control or the variant in our GA4 and ties it to the user. This will be the basis of our audience parameters.
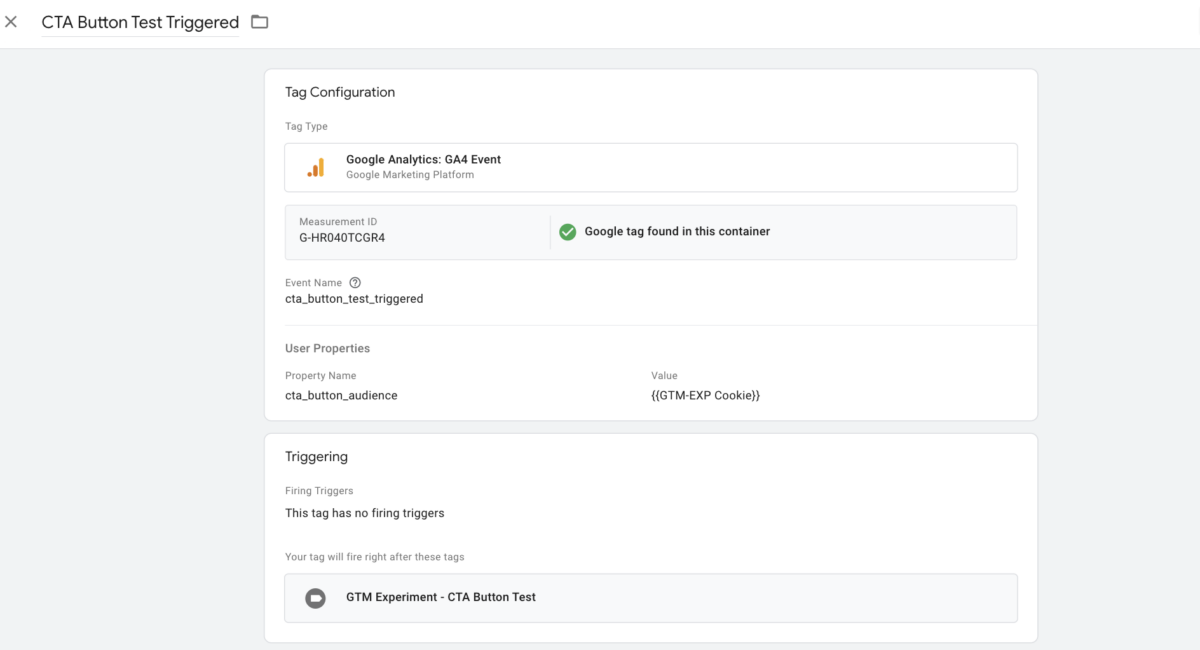
Now let’s make it a cleanup tag for our cookie placement.
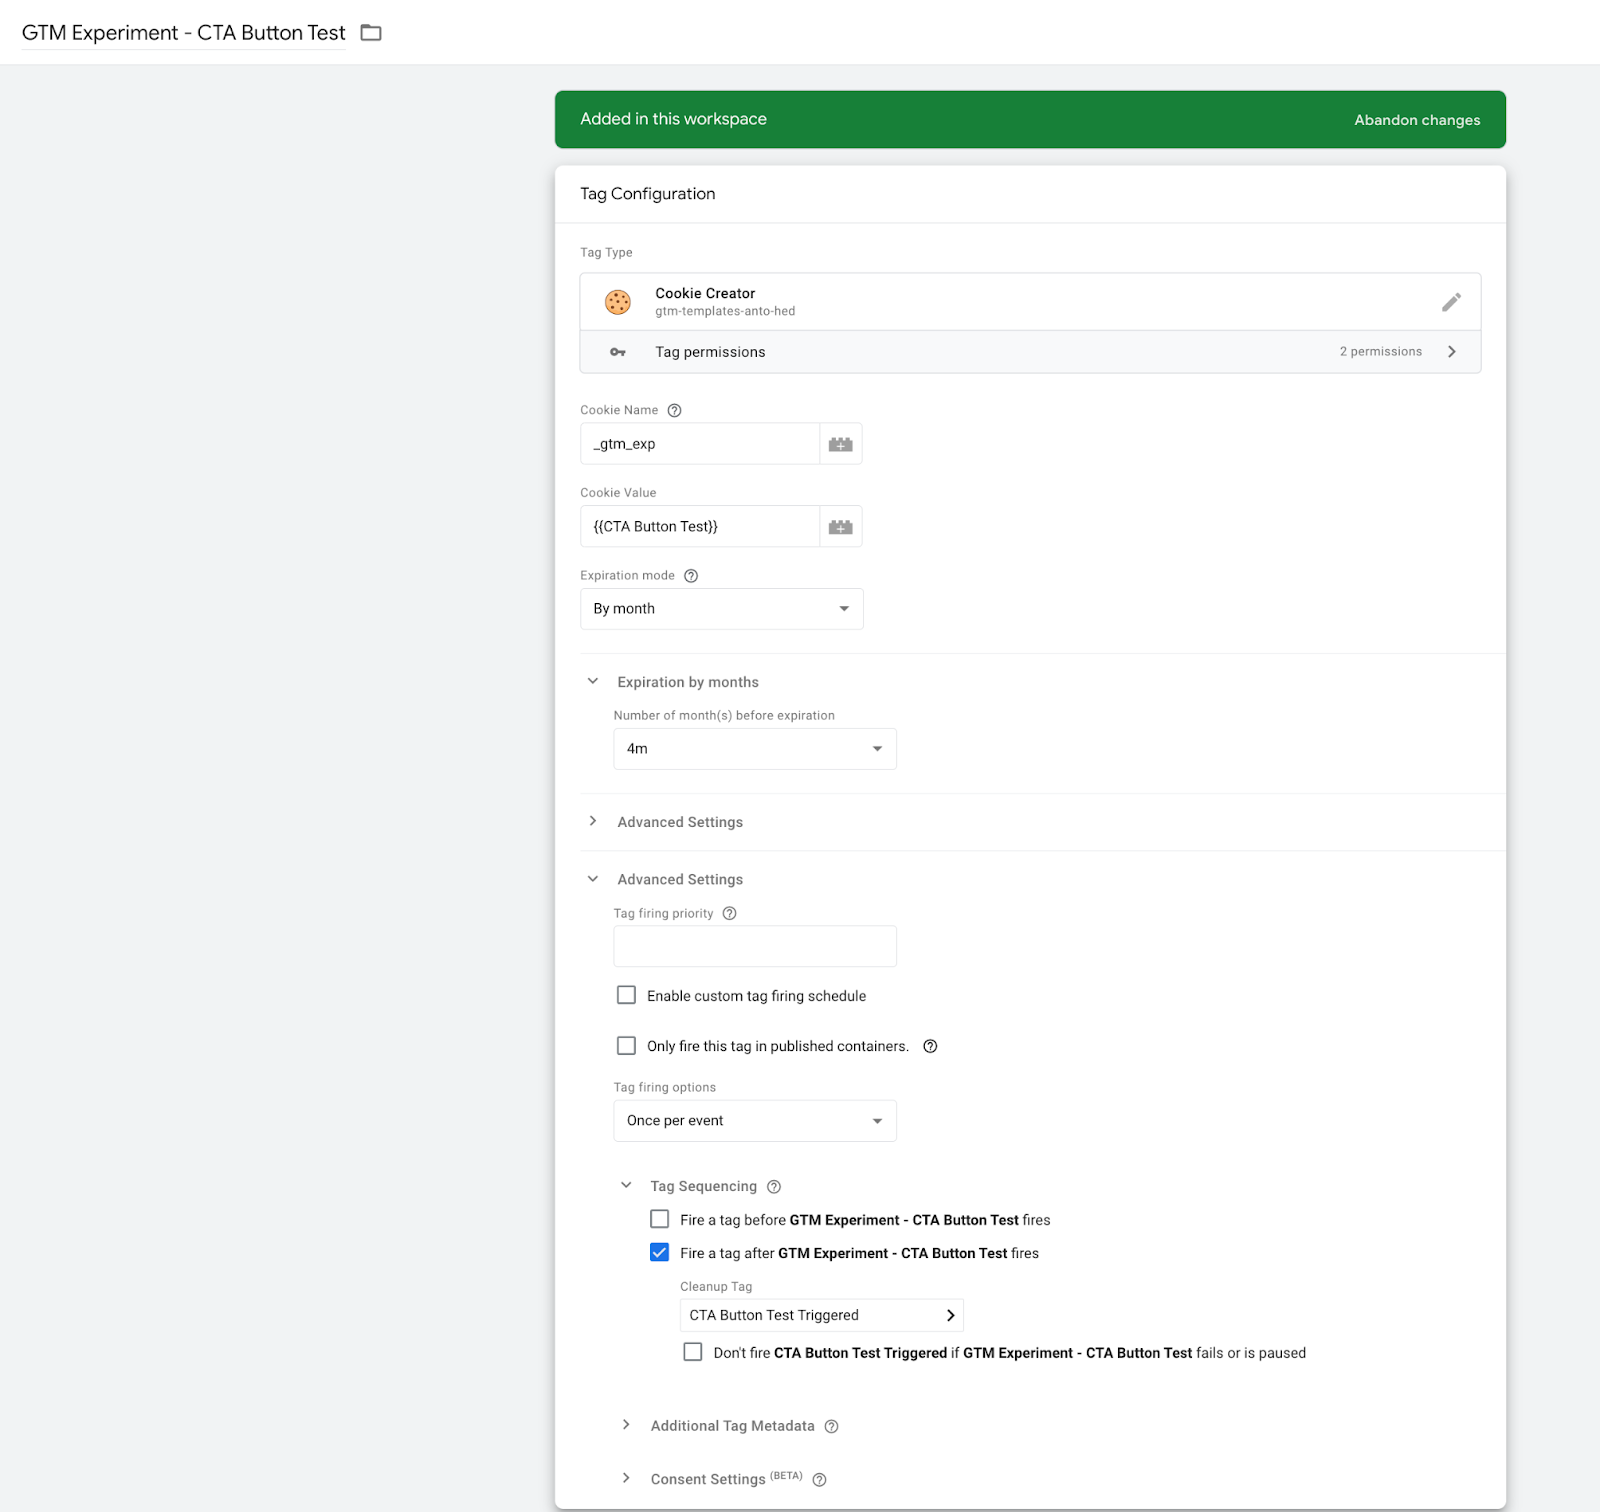
Awesome. One last thing. We also want to add to our main configuration tag. This ensures that as people come back to the website and the variant is there, it also communicates the value to the user-level custom dimension. It should remain with that user but this is a secondary level of protection from GA clear cache etc. It becomes a little more secure than just relying on the event itself as the event only fires the initial time that the user gets bucketed. The cookie will remain as a value as long as it’s stored in the person’s browser. After the initial placement, the cookie should be there on page load so you can capture it with your main configuration on pageview.
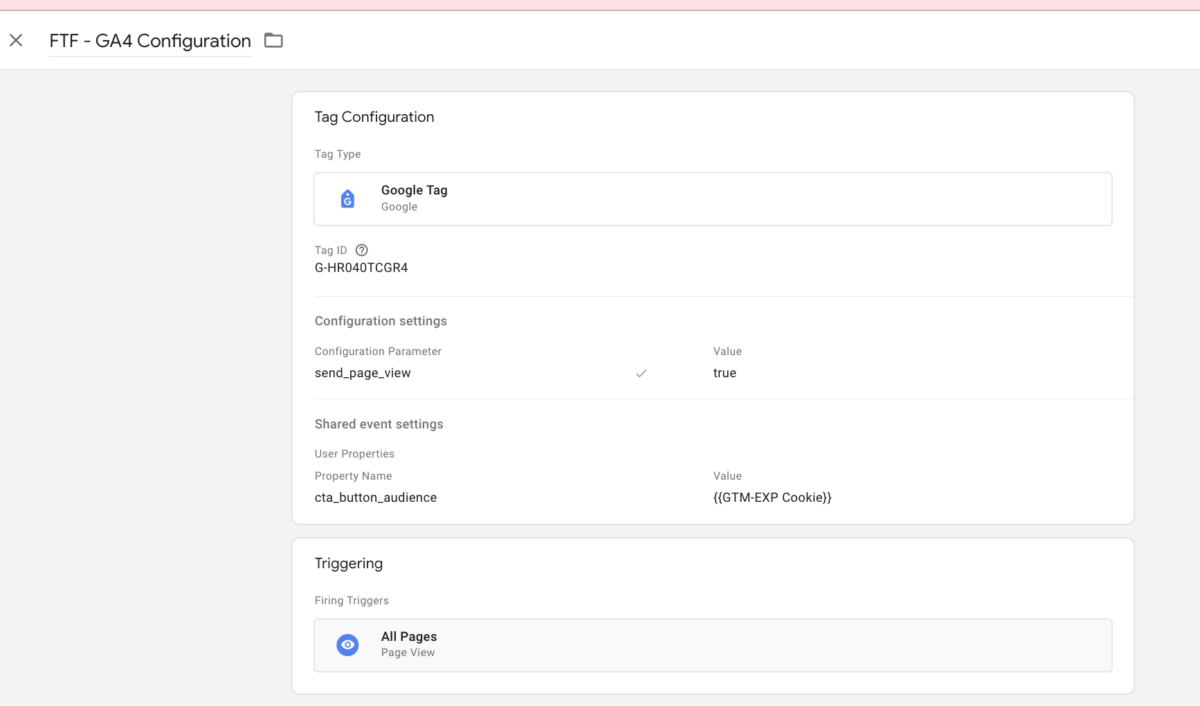
Note: You can also just move GA4 config to Dom Ready instead of doing the above (with the same configuration tag changes) but some people are violently against changing where GA loads, so that’s why we did the above approach.
Another Note: you can actually set the variable to an event level parameter instead of a user-based one since we will be building it as an audience who saw the particular event anyway, but I think User Properties are a bit cleaner. If you are running low on User-level custom dimensions, event custom dimensions are fine.
Build Your Conversions
If you already have a conversion that you want to use with this setup you can skip this section. Otherwise, if you want to set up a secondary conversion or you have no conversion you can follow along with the below to set up one.
Usually, our main conversion would be a form submit or purchase, but we are going to use cta clicks for this example.
Go into preview & debug mode and perform the action that you want to track.

Make sure you have any relevant built-in variables (click id, click class) and triggers (all elements/link clinks) enabled in your GTM.
Navigate to the click action that you did and find the relevant variable that you want to track.
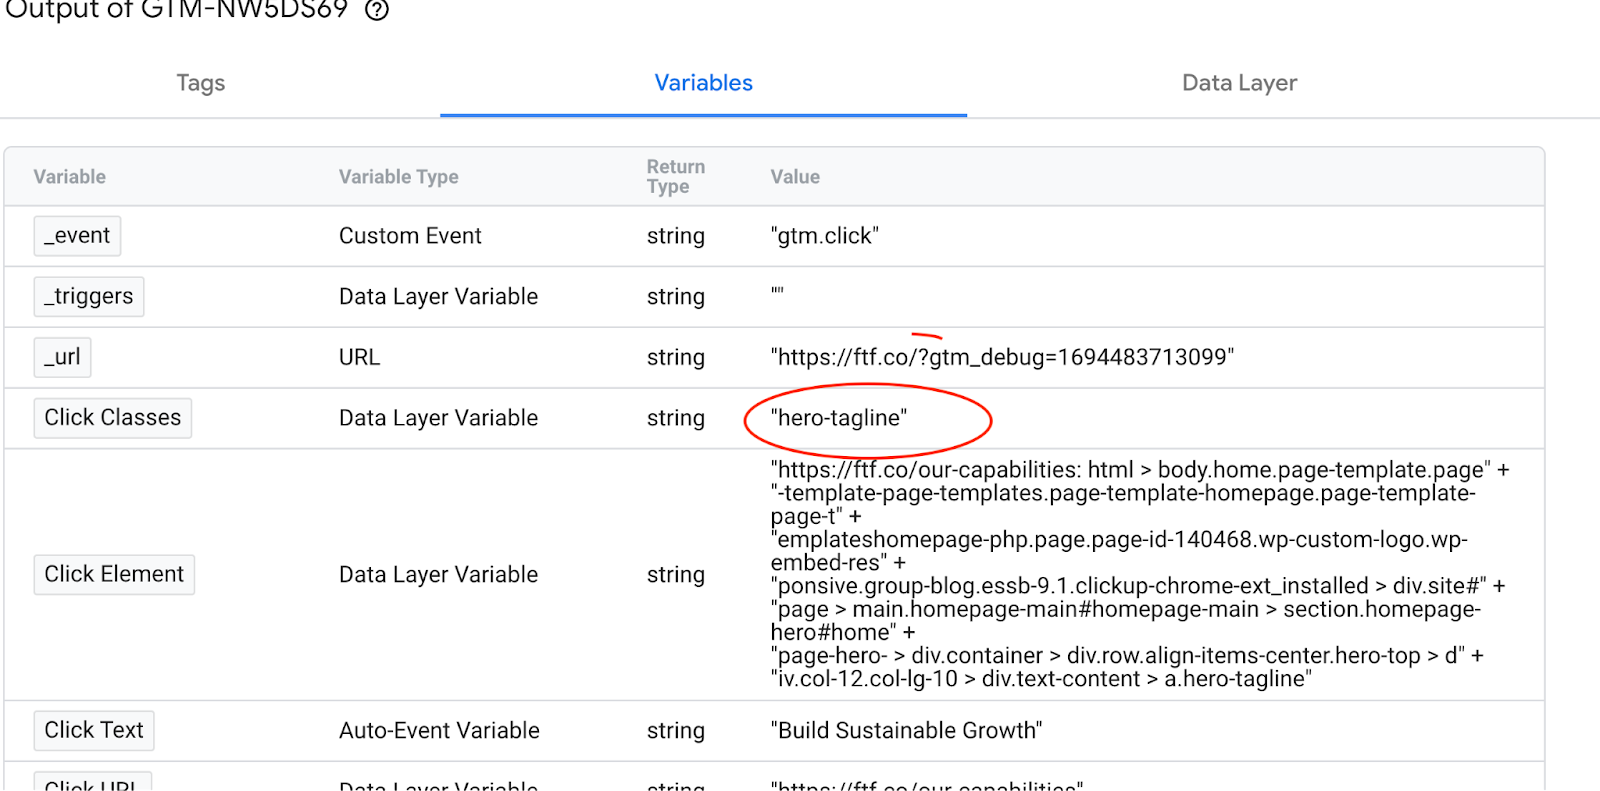
Build your trigger and event/conversion.
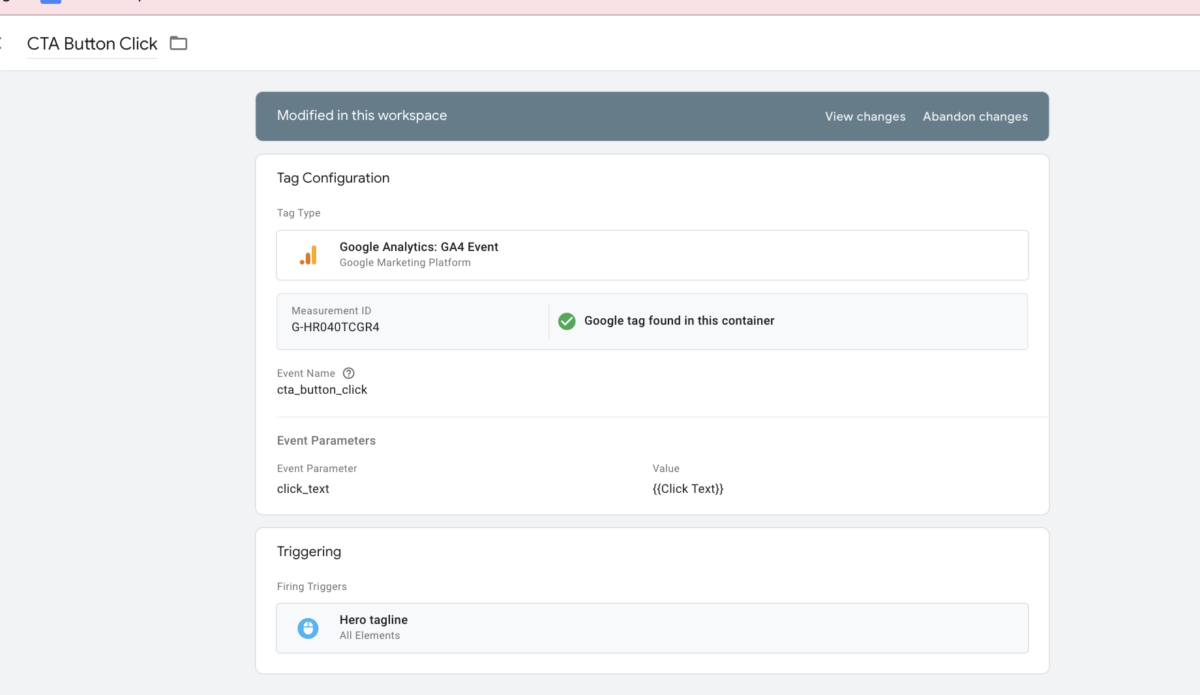
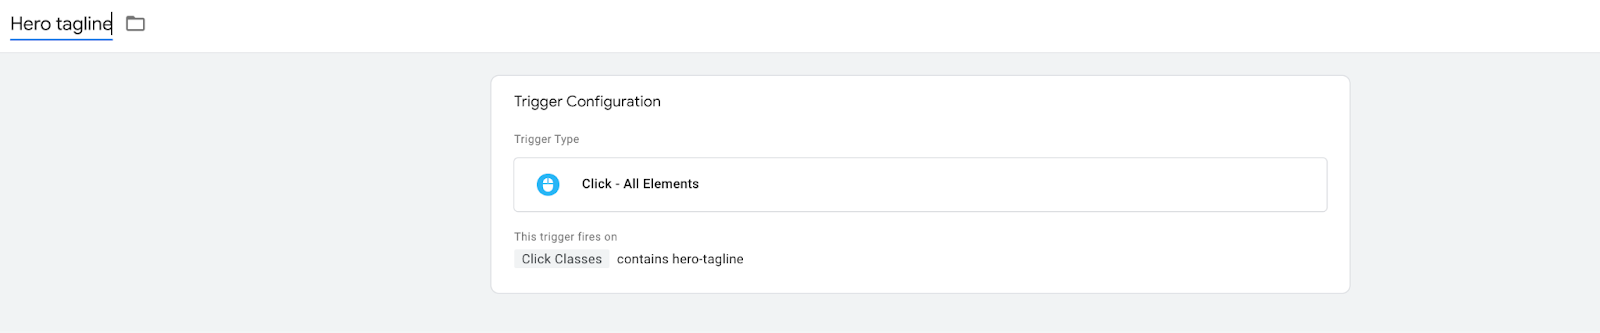
Great! We’ve just set up the action we want to use in GA4 as one of our conversions. The nice thing about building an audience or segment with our variations is that you can use those in conjunction with other conversions or events that are already in place (thank you pages, etc.)
Set Up the Conversion in Your Marketing Analytics Tool
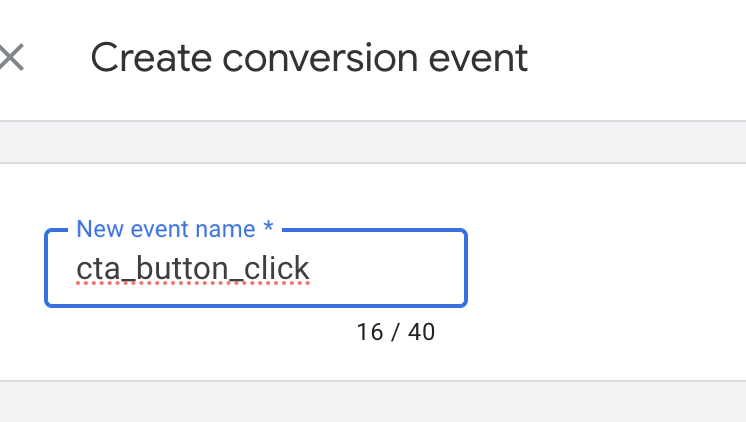
In GA4, there are a few steps we need to take to get this to work. First, we need to set up our conversions. Some may already be set up, but the one we just built above we need to set as a conversion. You can either wait for the event to show up in GA4 and then check the little blue toggle next to the event, or we can navigate to conversions and input the name of the event manually. Let’s do that one.
Set Up Your Custom Dimension in your Marketing Analytics Tool
Now that we have our conversion, let’s navigate to custom dimensions. Let’s create both a User based custom dimension for our cta_button_audience which is handling our cookie value.
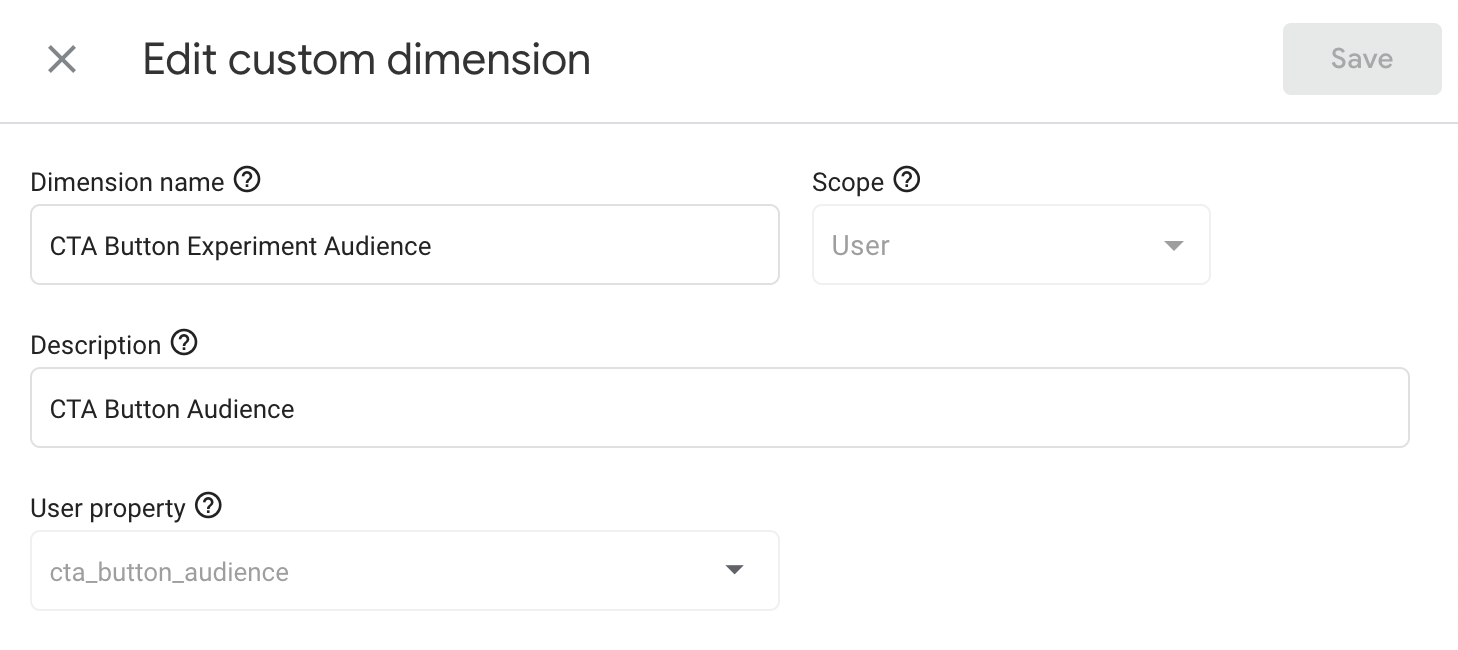
Note: If you don’t have click_text set up as a value in GA4 already, you’ll want to do that now for the cta_button_click event that we built. Every custom dimension needs to be defined in GA4 for the data to show up in the interface.
Finally, Let’s Build our Audiences!
You’ll want a unique audience per variant (including control).
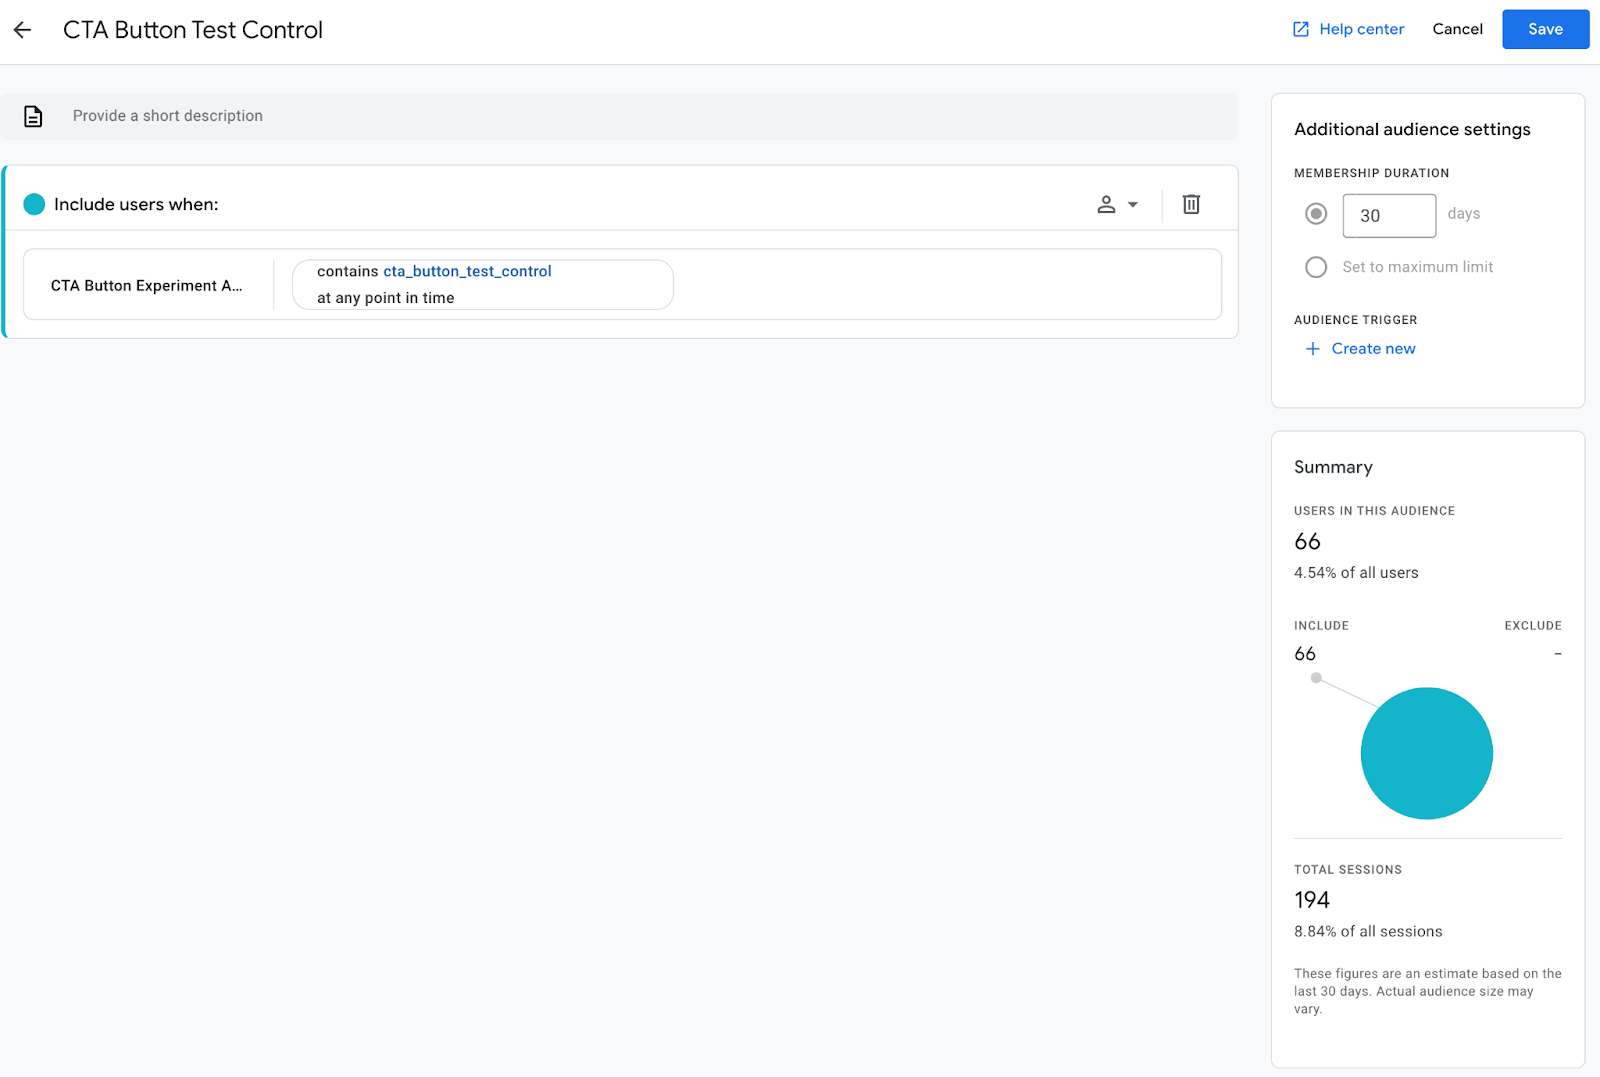
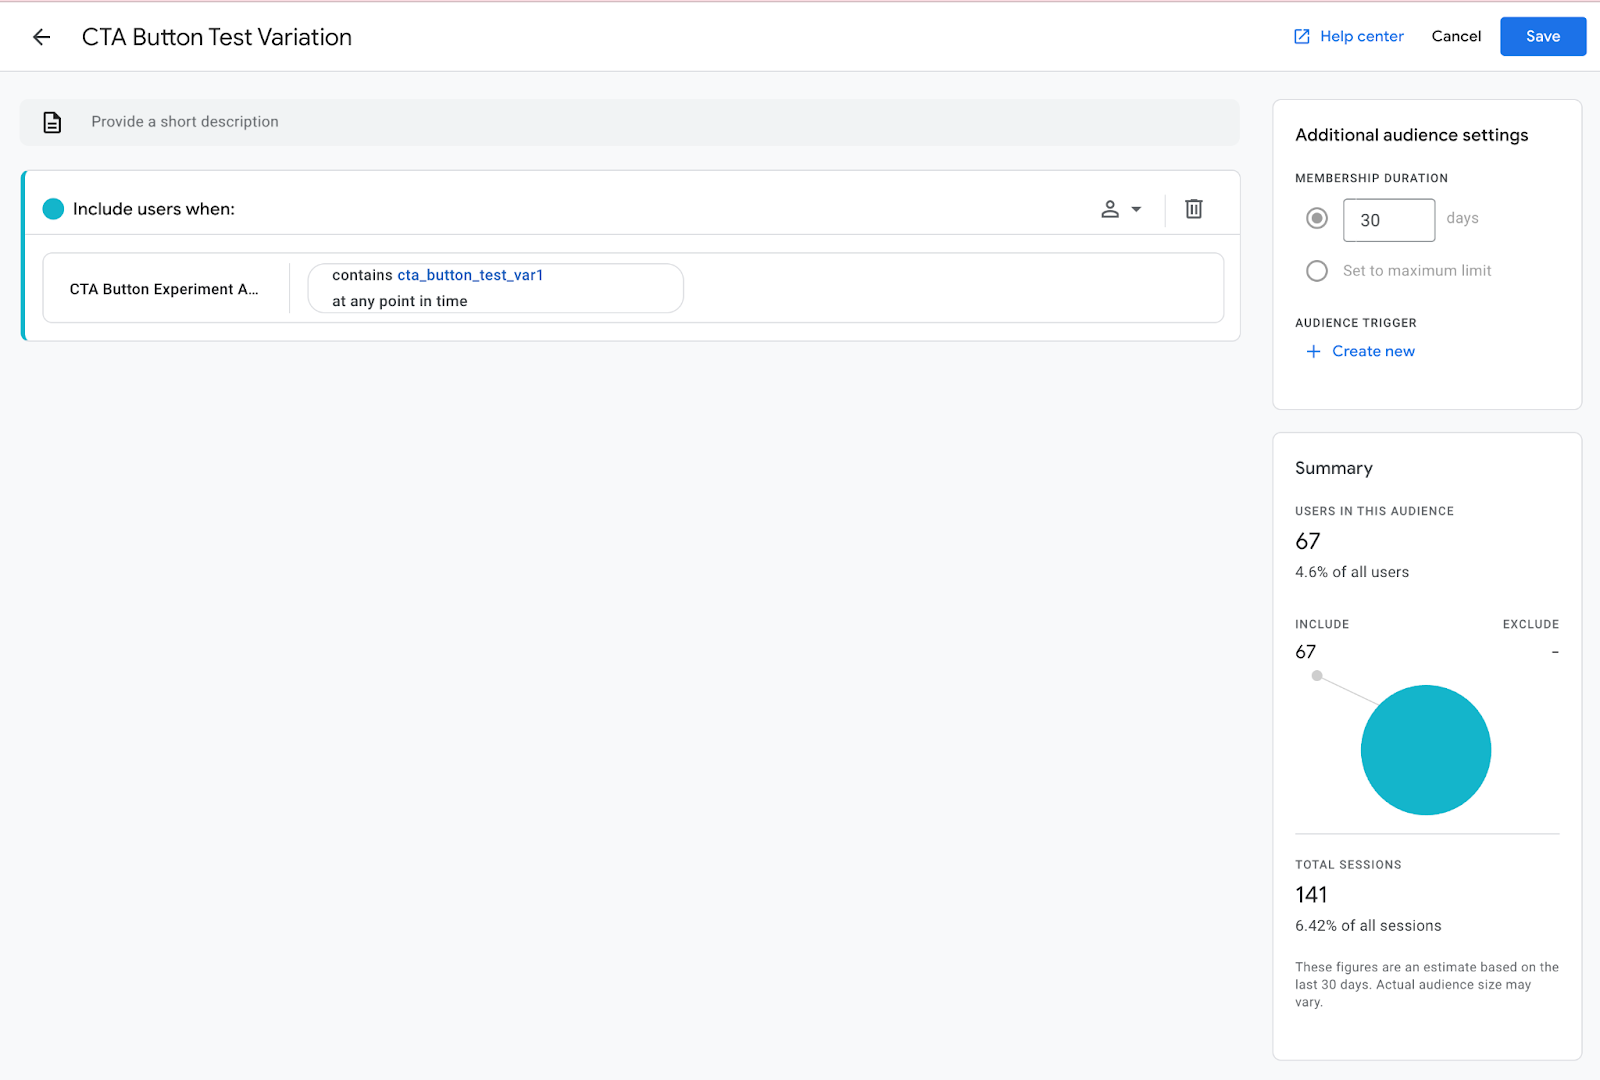
You’ll want to confirm that the amount of users in both the variant and the control are relatively equal. This will be an extra-level of comfort that our triggers and tags are working.
Now all we have to do is do an audience comparison with our conversions and we are swimming in A/B test sauce.
You can build an audience report by creating a custom report in the library and using the audience as a dimension.
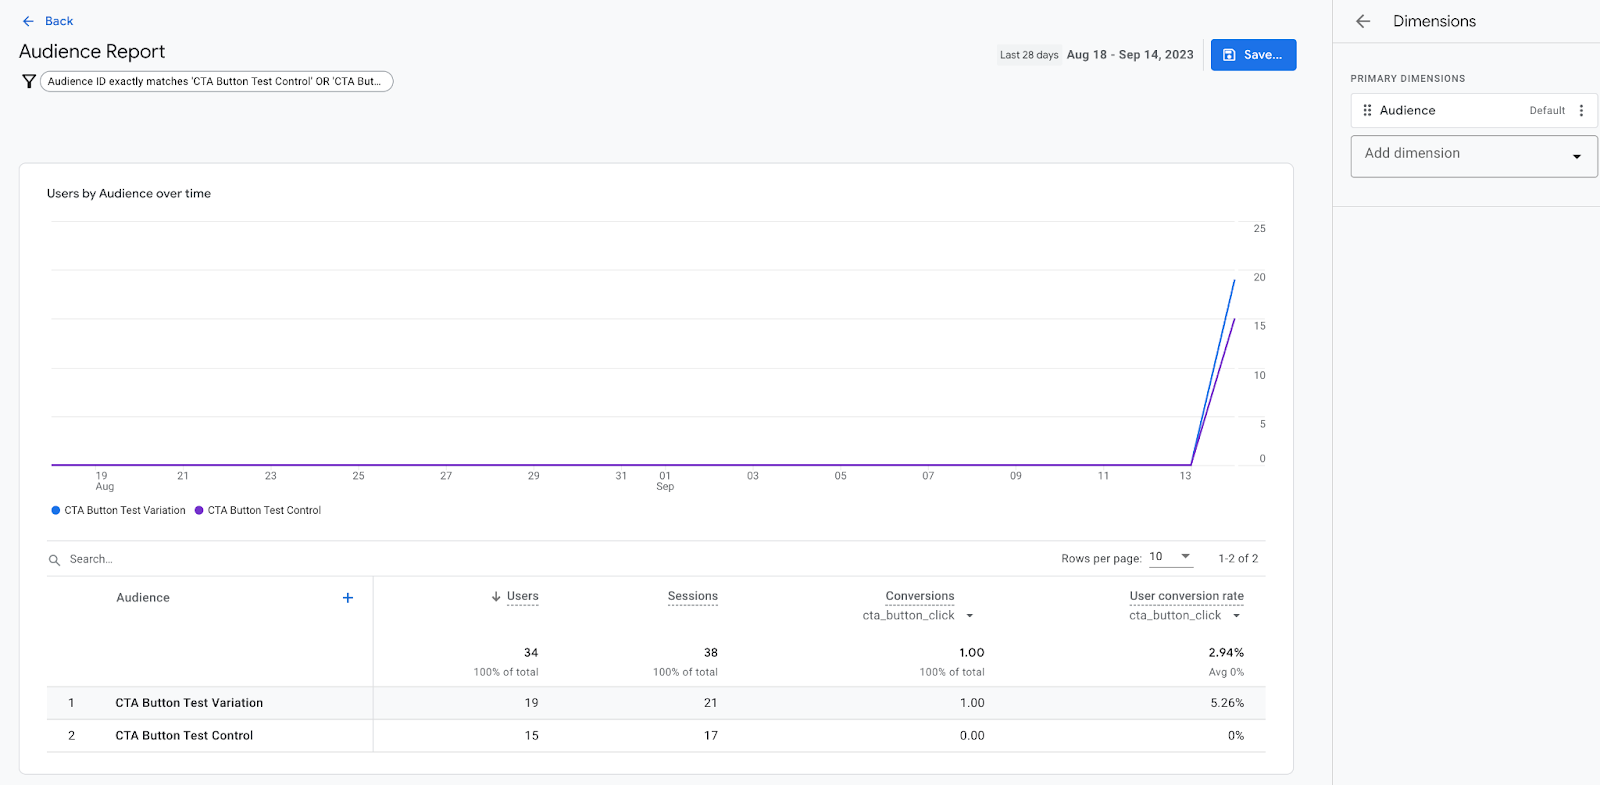
Alternatively, you could use our user-level custom dimension
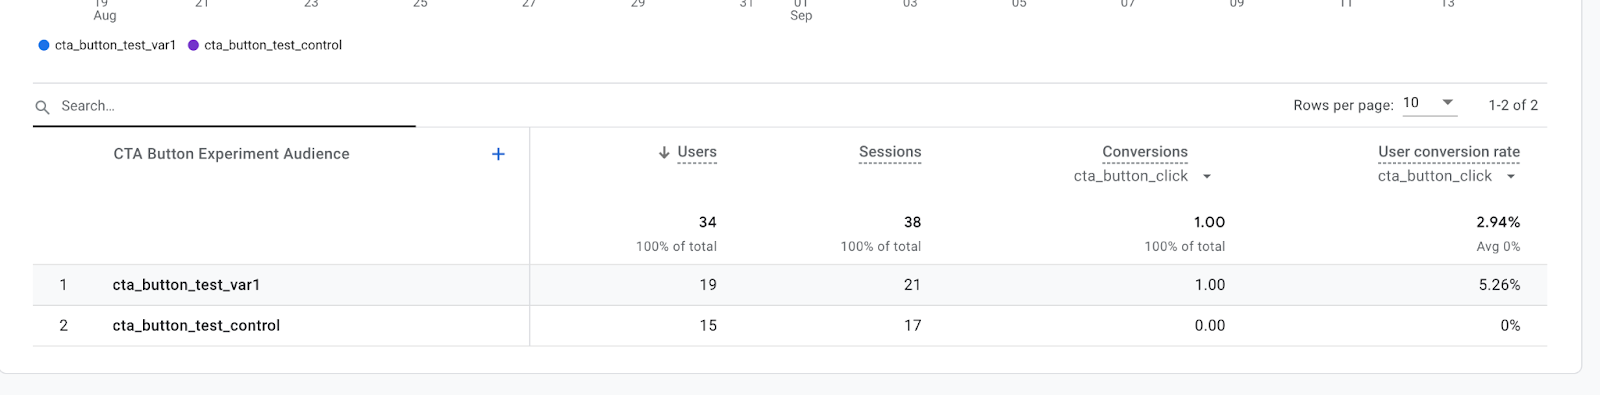
I find it’s a bit cleaner to use an audience because you can archive audiences when you are done with the test and you can choose to use the gtm_exp cookie to build alternative tests in the future and audiences help provide a general cleanliness around the reporting.
To run statistical significance tracking you can use any A/B test calculator but my preferred is CXL’s AB Test Calculator. Just dump your data in and it will calculate the lift for you!
Great job! You made it and can stop here. Or we can bring both variations into Microsoft Clarity. You want to continue??? I APPLAUD your tenacity.
Integrate with Heatmap
For this part of the lesson, we will assume you have Microsoft Clarity up and running. I like Microsoft Clarity a lot. It’s free and has a TON of features that are really valuable. For this particular task, we are going to be using the custom tag filter feature.
Navigate back into Google Tag Manager and find the Microsoft Clarity community template by Luratic. If you have Microsoft Clarity hard-coded, I suggest you migrate it to the template so that you can use their built-in custom tag feature, which we’ll be utilizing for this experiment. You can also do this with code instead of the template if you are a masochist.
Add in a key: cta_button_audience with the value of our GTM_Exp. Now you’ll be able to filter all pages by your cookie variation!
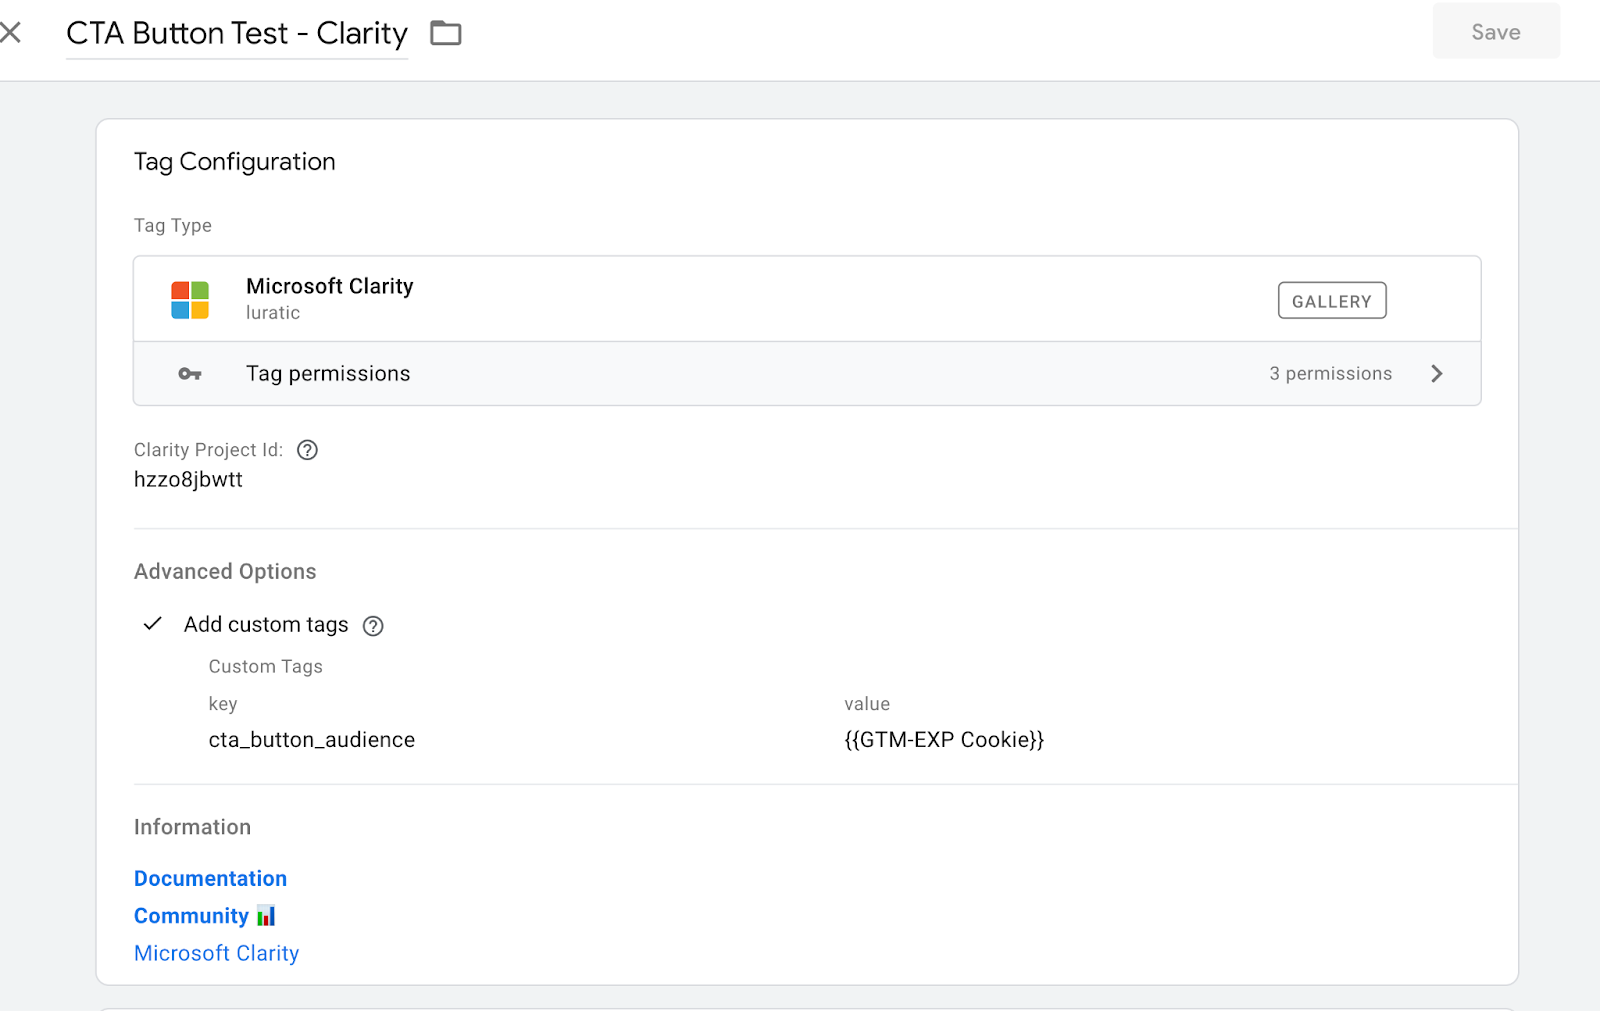
You can go one step further by also building custom events for your CTA clicks & conversions, which will make finding specific recordings much easier.
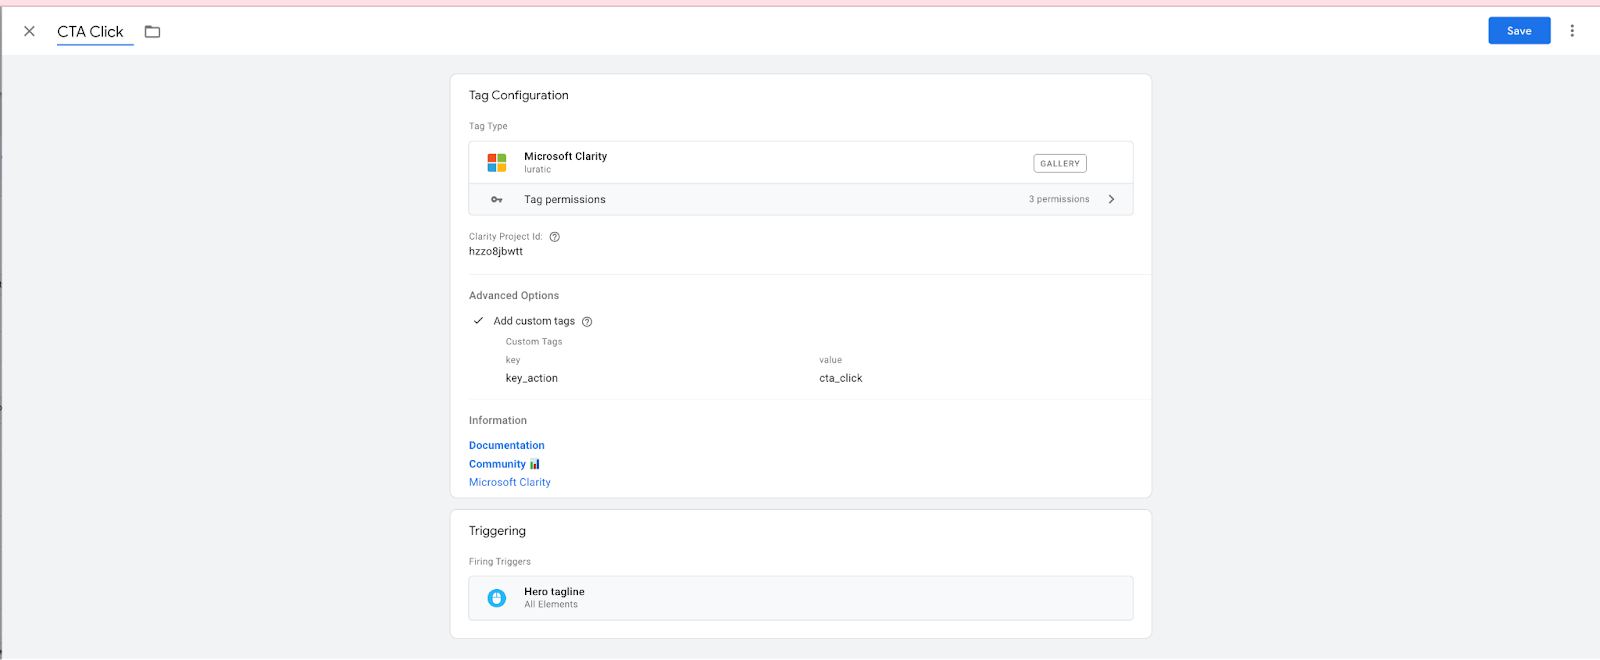
Now we have our new Custom Tags. Navigate back to Microsoft Clarity and find the custom filters.
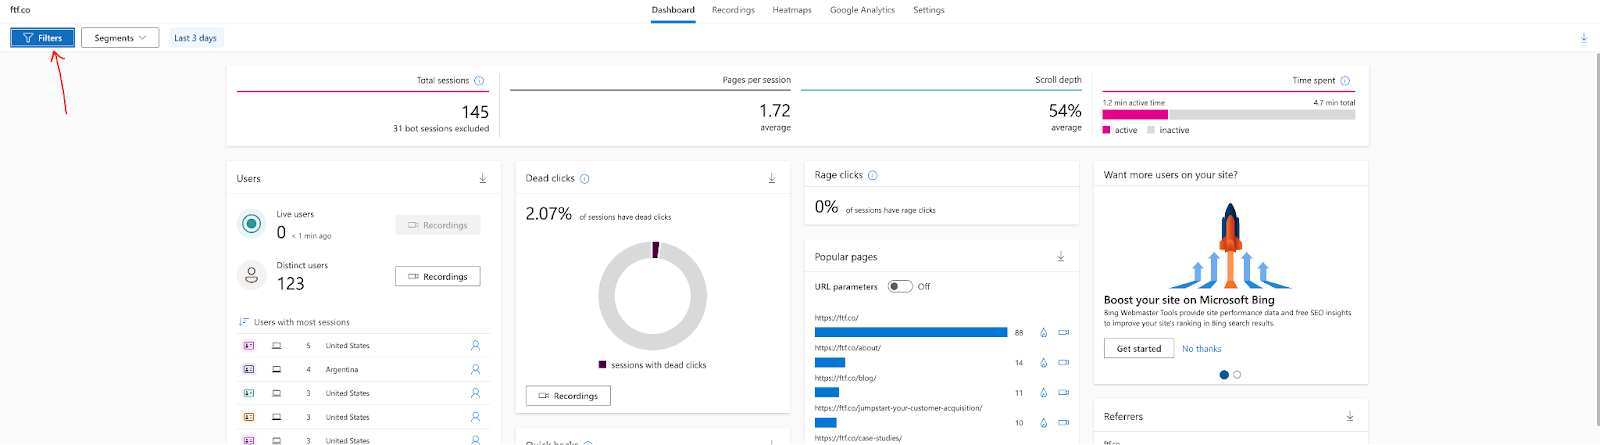
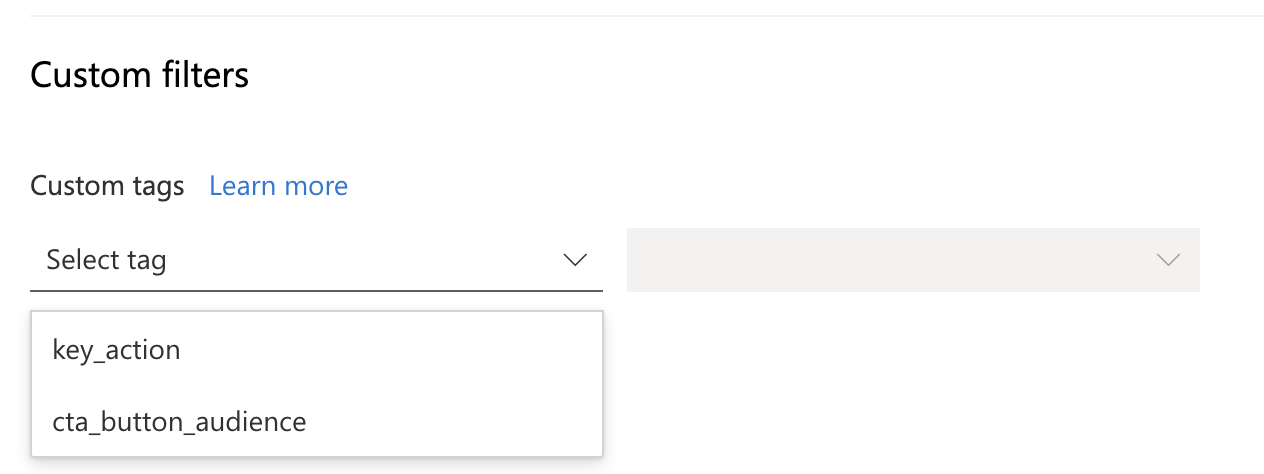
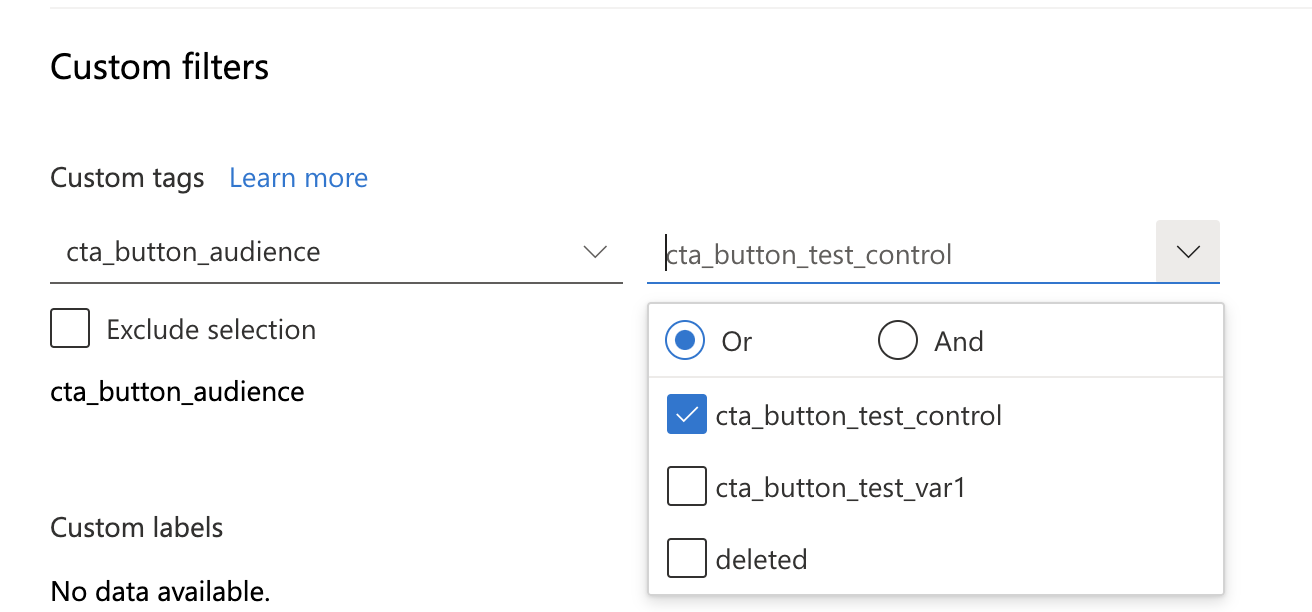
Now we can filter by both our key action that we want to see and also the different variations. This gives us ultimate clarity (pun intended) into how the different pages are performing with our variations! Give it a few days and you’ll get your changes in two different heatmaps!
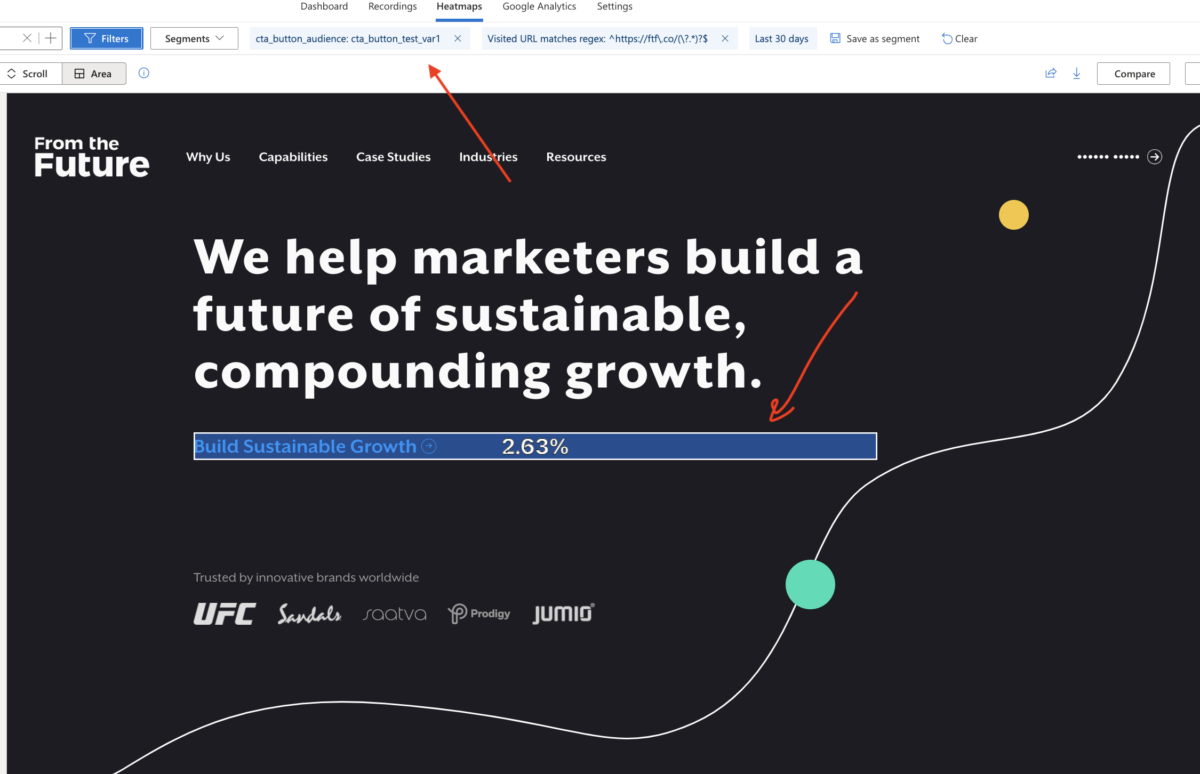
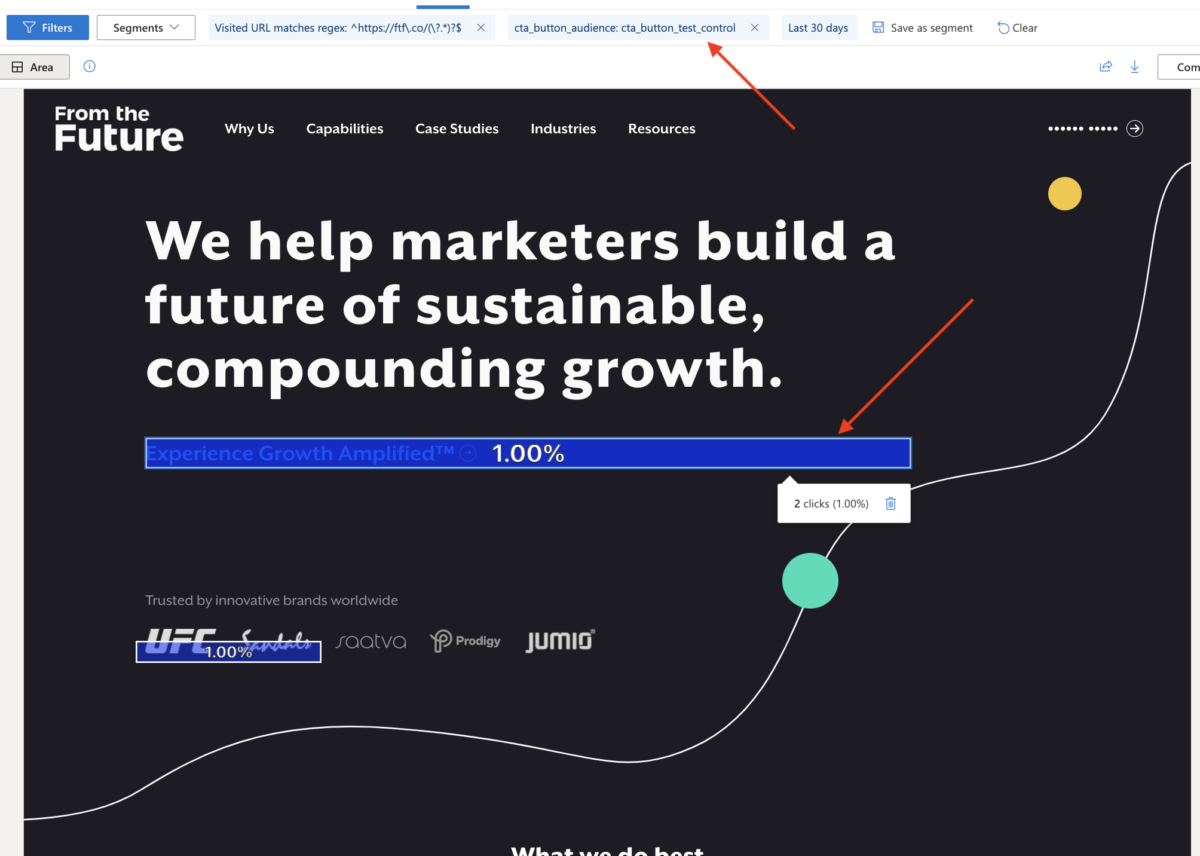
BONUS: if you integrate GA4 with Microsoft Clarity you can also pull in your GA4 segments (audiences), making this a breeze to analyze! I still like having the filters but it can help streamline the process.
PHEW! We’ve Reached the End
You did it! You made it! You created a fully functioning A/B test machine in GTM with FREEEEE tools. But yeah that was a lot of work. You may want to pay for something to avoid the long and drawn out (but cool) process above. But if you don’t and you end up using this solution…maybe you can pay me instead 🙂